How IoT Technology is Revolutionizing Smart Gardening: A Practical Guide
Estimated Reading Time: 11 minutes
Key Takeaways
- IoT Simplifies Gardening: Internet of Things (IoT) technology uses connected sensors and devices to automate and optimize plant care, removing guesswork.
- Sustainability Link: Smart gardening mirrors sustainable agriculture principles by conserving resources like water and fertilizer through data-driven decisions.
- Steps to Start: Building a smart garden involves planning, selecting compatible devices, proper installation, and using data for automation and monitoring.
- Troubleshooting is Key: Be prepared to address common issues like connectivity problems, device malfunctions, and data interpretation challenges.
- Future is Smarter: Expect advancements like AI-assisted care, drone monitoring, and robotics to further enhance home gardening.
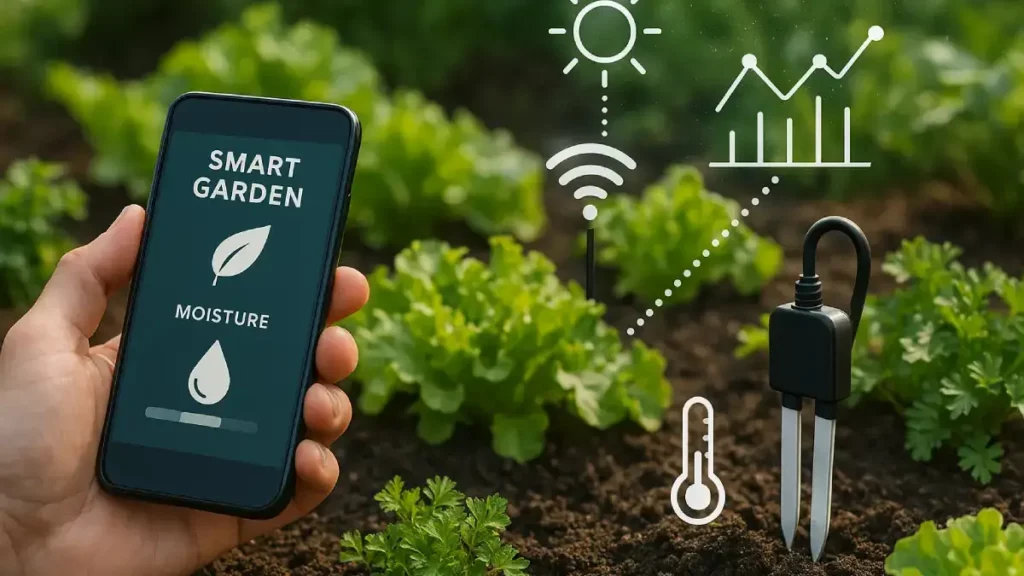
Table of contents
Gardening used to mean getting your hands dirty, guessing what plants needed, and hoping for the best. But now, technology is changing everything. Imagine knowing exactly when your plants need water or what nutrients are missing from the soil, all thanks to tiny sensors and smart systems. This is the power of IoT Technology (Internet of Things).
IoT Technology is like a team of tiny helpers connected to the internet. These helpers are devices like sensors and controllers. They gather information about their surroundings, share this information online, and use it to make smart decisions or even do tasks automatically.
“This amazing IoT Technology is now coming to our backyards and homes, transforming regular home gardening into smart gardening.”
A smart garden uses these connected devices to make growing plants easier, more successful, and better for the planet. You can also explore other ways to make your home smarter for more efficient living.
This blog post is your practical guide. We’ll show you how IoT Technology works in the garden and how you can use it yourself.
Building a smart garden offers great benefits:
- Saves Water: Systems water plants only when needed, using less water.
- Healthier Plants: Gives plants the exact conditions they need to grow strong.
- Less Work: Automates tasks like watering, saving you time and effort.
Let’s dig into how IoT Technology can help you grow a fantastic smart garden.
Understanding IoT Technology in Smart Gardening
So, what exactly is IoT Technology when we talk about smart gardening? Think of it as a smart system for your plants. It uses connected electronic devices, like sensors buried in the soil or tools that water your plants automatically.
These devices watch over your garden’s environment. They measure things like how wet the soil is, the temperature, and how much light your plants get. They send this information over the internet, often to an app on your phone. This data helps you understand exactly what your plants need.
IoT Technology connects the old ways of home gardening with new, powerful tools. Instead of guessing, you get real facts about your garden. This means you can take better care of your plants with less guesswork.
“Gardening has changed a lot over time. People used to rely only on experience and observation. Now, smart gardening adds technology to help us be more precise.”
IoT Technology lets us monitor and control garden conditions like never before. It helps make sure plants get exactly what they need, when they need it. This leads to healthier plants and better harvests, even for beginners.
IoT technology helps automate tasks too. For example, it can turn on your sprinklers automatically when the soil gets dry. This makes gardening much easier and more efficient. Smart thermostats in your home also provide similar energy efficiency and automated control, helping you save money and reduce consumption.
Research shows that “IoT in gardening involves interconnected devices that collect and analyze data to optimize plant care.” This collected information gives you valuable insights for taking care of your plants, making smart gardening a data-driven activity.
The Connection Between IoT and Sustainable Agriculture
You might think that IoT Technology in your small smart garden is just a cool gadget. But it’s actually using the same ideas that help big farms practice sustainable agriculture. Sustainable agriculture means growing food in a way that’s good for the planet, uses resources wisely, and can continue for a long, long time.
How does IoT Technology help with this? It’s all about data. The sensors in your smart garden collect information about soil moisture, light, and temperature. This information helps you make smarter decisions.
Here’s how using IoT Technology makes your garden more sustainable:
- Saving Water: Smart watering systems use soil moisture data. They only water when the soil is actually dry and only give the right amount. This stops water waste. Big farms use similar technology, called precision irrigation, to save huge amounts of water.
- Using Less Fertilizer: Some smart sensors can check the nutrient levels in your soil. This tells you if your plants really need fertilizer and exactly how much. You avoid using too much, which is better for the soil, prevents pollution in runoff water, and saves you money. This is like targeted fertilization used in sustainable agriculture.
- Saving Energy: Automated systems, like lights or heaters in a greenhouse, can be set to turn on and off only when needed, based on sensor readings. This saves electricity compared to leaving them on timers or all the time. By using green tech innovations you can create an overall sustainable living space that extends beyond your garden.
- Reducing Food Waste: By giving plants the perfect conditions, IoT Technology helps them grow strong and healthy. This means better harvests and less chance of plants dying or producing poorly. More successful growing means less wasted effort and potentially less wasted food if you’re growing edibles. You can further reduce food waste in your home by using AI and smart kitchen technology.
Using IoT Technology in your smart garden connects your home gardening efforts to the bigger picture of sustainable agriculture. It helps you use resources like water and fertilizer carefully.
“Research confirms this link: ‘This technology bridges the gap between home gardening and large-scale sustainable agriculture, promoting resource conservation and eco-friendly practices.’ By using these smart tools, even hobby gardeners can contribute to more eco-friendly growing methods.”
Essential IoT Devices for Your Smart Garden
Ready to build your own smart garden? You’ll need some special IoT devices. These gadgets are the eyes, ears, and hands of your smart gardening system. Let’s look at the key ones:
Soil Sensors
Soil sensors are often the first IoT device people add to their smart garden. They are small probes you stick into the soil near your plants.
- What They Do: These sensors measure important things right where the roots are:
- Moisture Level: Tells you how wet or dry the soil is. This is key for proper watering.
- Soil pH: Measures how acidic or alkaline the soil is. Different plants prefer different pH levels.
- Nutrient Content: Some advanced sensors can check for key nutrients like Nitrogen (N), Phosphorus (P), and Potassium (K).
- Temperature: Soil temperature affects seed germination and root growth.
- Placement: For best results, place the sensor probe deep enough to reach the root zone of your plants. If you have a large garden bed, you might need multiple sensors in different spots, as soil conditions can vary. Avoid placing them right next to rocks or large roots.
- Price: Basic soil sensors focusing on moisture can cost around $30-$50. More advanced models measuring pH and nutrients might range from $50 to $100 or more. Brands like Ecowitt, SensorPush, or specific smart garden kit brands often offer reliable options.
- Using the Data: The sensor usually sends data to an app. The app might show moisture as a percentage or use simple terms like “Dry,” “Moist,” or “Wet.” You can learn the ideal moisture range for your specific plants (e.g., succulents like it dry, ferns like it moist) and water accordingly.
“Research suggests: ‘For beginners, soil sensors are an excellent starting point, offering valuable insights into plant health at a relatively low cost.’ They provide fundamental information needed for effective smart gardening.”
Automated Irrigation Systems
Tired of dragging hoses or forgetting to water? Automated irrigation systems are a game-changer for any smart garden. These systems work hand-in-hand with soil sensors.
- How They Work: A smart controller connects to your water supply and your soil sensors. When sensors detect that the soil is too dry for your plants’ needs, the controller automatically turns on the water. It delivers just the right amount and then shuts off. This means precise watering tailored to actual conditions, not just a fixed schedule.
- Components:
- Smart Controller: The ‘brain’ that connects to WiFi, reads sensor data, and controls the watering schedule. Examples include Rachio, Orbit B-hyve, or Wyze Sprinkler Controller.
- Valves: Electronic valves that open and close to let water flow to specific garden zones.
- Delivery System: This could be drip lines (great for targeted watering at the base of plants), sprinklers, or soaker hoses, depending on your garden setup.
- Benefits: The main benefit is significant water savings – often 30-50% compared to manual watering or simple timers. This saves money on water bills and conserves water. The return on investment (ROI) depends on your water costs and the system’s price, but many users see savings within 1-3 years. Plus, plants are healthier because they get consistent, correct watering.
- Installation: Setting up can range from easy to complex. Replacing an existing sprinkler controller with a smart one is often straightforward. Installing a new system with valves and drip lines requires more plumbing and electrical work (low voltage) and might be best left to a professional if you’re not comfortable with DIY projects.
Climate Monitors
Plants don’t just care about the soil; the air around them matters too! Climate monitors are IoT devices that track atmospheric conditions in your garden area.
- Functionality: These devices typically measure:
- Air Temperature: Important for plant growth cycles and identifying potential frost or heat stress.
- Humidity: Affects water evaporation from soil and leaves, and can influence disease risk.
- Light Exposure: Measures the amount of sunlight (often in lux or PAR units) reaching your plants. Crucial for photosynthesis.
- Air Quality: Some advanced monitors might check for pollutants, though this is less common for basic garden setups.
- Benefits: Knowing the climate helps you choose the right plants for your specific location (e.g., full sun vs. shade plants). It also helps you decide the best placement for plants within your garden. If you have a greenhouse, climate data is essential for managing vents, fans, or heaters.
- Integration: Many climate monitors can connect with other smart home systems (like Alexa or Google Home) or integrate with your smart irrigation controller. For example, some systems might automatically adjust watering schedules based on rainfall detected by a weather sensor or high temperatures. Brands like Netatmo, AcuRite, or Govee offer weather stations or sensors. To secure your investment in smart gardening technology, consider implementing a smart home security system.
Smart Plant Monitoring Systems
Instead of buying separate sensors, you can opt for an all-in-one smart plant monitoring system. These often combine several sensing functions into one device or kit.
- Description: These integrated systems might include a soil probe, a climate sensor, and sometimes even a small camera, all reporting to a single app. They are designed to give a complete picture of your plant’s environment. Examples include systems from companies like Edyn (though sometimes availability varies) or specialized indoor smart pots.
- App Features: The apps are usually very user-friendly. They display all the data in one place, often with graphs showing trends over time. They typically send push notifications to your phone if conditions go outside the optimal range (e.g., “Soil is too dry,” “Temperature too low”). Some apps even have databases to identify your plant and provide specific care recommendations.
- Price: All-in-one systems vary widely in price. Simple smart pots might start around $50-$100, while more comprehensive outdoor kits with multiple sensors could cost several hundred dollars. Consider the features you need and the size of your garden when choosing.
These essential IoT devices form the backbone of a successful smart garden, turning guesswork into data-driven smart gardening.
Step-by-Step Guide to Building Your Smart Garden
Ready to start your smart garden adventure? It might seem technical, but breaking it down into steps makes it manageable. Here’s a guide to help you implement IoT Technology in your home gardening.
Step 1: Assessment and Planning Your Smart Garden
Before buying any gadgets, take some time to plan. Good planning makes the setup smoother and ensures your smart garden meets your needs.
- Assess Your Space:
- Indoor or Outdoor? The types of devices and their weatherproofing needs will differ.
- Size: How big is the area? A small balcony needs fewer sensors than a large backyard. Measure the space.
- Light Exposure: How much sun does the area get? Full sun, partial shade, full shade? This affects plant choice and maybe the need for light sensors. Note how the sun moves across the area during the day.
- Water Access: Where is your nearest water spigot or source? This impacts irrigation setup.
- Power Access: Do you have outdoor outlets if needed for controllers or hubs?
- Determine Plant Types:
- What do you want to grow? Vegetables, flowers, herbs, houseplants?
- Research the specific needs of these plants. Do they need consistently moist soil, or do they prefer to dry out between waterings? What are their light and temperature preferences? This information will guide your sensor settings and automation rules.
- Create a Layout:
- Sketch your garden area. Mark where you plan to put different plants or groups of plants.
- Think about “zones.” Plants with similar watering needs should be grouped together. This is important for setting up automated irrigation.
- Mark where you plan to place soil sensors (near root zones, representative spots), climate monitors (central location, out of direct rain/sun if needed), and the irrigation controller (near power and water source).
- Budgeting:
- How much do you want to spend initially? Smart gardening can range from under $50 for a basic moisture sensor to hundreds or thousands for complex systems.
- Prioritize. Start with essentials like soil sensors and maybe one climate sensor. You can always add more IoT devices later.
- Factor in potential costs for connectors, extra wiring, batteries, or subscription fees for some apps (though many are free).
Step 2: Selecting and Purchasing IoT Devices for Smart Gardening
Now that you have a plan, it’s time to choose your IoT devices. For those also interested in sustainable transportation, exploring electric bikes for commuting can complement your eco-conscious lifestyle.
- Selection Criteria:
- Garden Size: Larger gardens may need sensors with longer range or multiple sensors connected to a hub.
- Plant Types: Plants with very specific needs might benefit from more precise sensors (e.g., measuring pH or nutrients).
- Budget: Stick to your budget from Step 1. Compare features vs. cost.
- Ease of Use: Look for devices with user-friendly apps and clear instructions, especially if you’re new to IoT Technology. Check online reviews.
- Start with the Basics: As mentioned, reliable soil sensors are the foundation of smart gardening. They provide the most critical information – water needs. A basic WiFi or Bluetooth soil moisture sensor is a great first purchase.
- Trusted Brands and Models:
- Soil Sensors: Ecowitt WH51, SensorPush HT.w, Moen Smart Wireless Soil Sensor.
- Irrigation Controllers: Rachio 3, Orbit B-hyve XR, Wyze Sprinkler Controller.
- Weather Stations/Climate Monitors: Netatmo Weather Station, AcuRite Atlas, Govee WiFi Weather Station.
- (Note: Availability and models change, so check recent reviews before buying).
- Compatibility:
- Check if the devices use WiFi (common) or Bluetooth (shorter range, might need your phone nearby). Some use proprietary hubs (like Zigbee or Z-Wave).
- If you already use smart home systems (Alexa, Google Home, Apple HomeKit, SmartThings), check if the garden devices are compatible. Integration allows voice control or routines involving other smart devices.
- Ensure the device’s app is compatible with your smartphone (iOS or Android).
Step 3: Installing Your Smart Garden Devices
You’ve got your IoT devices! Now it’s time to set them up. Follow the manufacturer’s instructions carefully.
- Device Installation and Positioning:
- Soil Sensors: Insert the probe into the soil to the recommended depth (usually near the plant roots). Avoid forcing it through hard soil or rocks. Place it where it represents the average condition for that zone.
- Climate Monitors: Mount them according to instructions. Usually, this means placing them out of direct, prolonged sunlight and rain (unless fully weatherproof) to get accurate air readings. Ensure good airflow around the sensor.
- Irrigation Controllers: Mount the controller near a power outlet (often indoors like a garage) and connect it to your sprinkler system valves according to the manual. This might involve some wiring.
- Connecting to WiFi:
- Most IoT devices connect directly to your home WiFi network (usually the 2.4GHz band).
- Follow the app’s instructions: This typically involves putting the device in pairing mode (often by pressing a button), finding the device in the app, selecting your WiFi network, and entering the password.
- Ensure your WiFi signal is strong enough to reach the device’s location in the garden. You might need a WiFi extender if the signal is weak.
- App Configuration:
- Download the device’s companion app from your app store.
- Create an account.
- Add your new device(s) following the on-screen prompts.
- Give your devices meaningful names (e.g., “Tomato Bed Sensor,” “Backyard Sprinkler”).
- Configure basic settings like location (for weather data), plant type (if the app supports it), and measurement units (°C/°F).
- Initial Calibration:
- Some sensors, especially pH or nutrient sensors, might need calibration before first use or periodically. Follow the manufacturer’s specific instructions. This might involve using standard calibration solutions. Moisture sensors usually don’t need calibration but check the manual.
“Research advises to ‘Connect devices to a central hub or smartphone app‘ and ‘Ensure all components are properly integrated.‘ This connectivity is key for the whole smart garden system to work together.”
Step 4: Mastering Smart Gardening Data Monitoring and Automation
With everything installed, the real smart gardening begins: using the data. If you are passionate about sustainability, you might be interested in powering your smart garden (and home) with renewable energy sources.
- Interpreting Initial Data:
- Let the soil sensors settle for a few hours or a day to get stable readings.
- Check the app. Look at the current moisture levels, temperature, light, etc.
- Compare these readings to the known needs of your plants. Is the soil too dry? Is it getting enough light?
- Watch the data trends over a few days. How quickly does the soil dry out? When are the hottest parts of the day? This helps you understand your garden’s microclimate.
- Setting Up Automation:
- This is where IoT Technology shines! If you have an automated irrigation system, link it to your soil sensors through the app.
- Set watering triggers. For example: “If Tomato Bed Sensor reports moisture below 30%, run Zone 1 sprinklers for 10 minutes.”
- You can often set “smart schedules” where the system uses sensor data AND weather forecasts to water optimally.
- If you have smart plugs controlling grow lights or fans, you can automate them based on climate sensor readings (e.g., turn on fan if humidity > 70%).
- Creating Custom Alerts:
- Set up notifications for important events. Get an alert on your phone if:
- Soil moisture drops critically low.
- Temperature falls near freezing.
- A device’s battery is low.
- Connectivity is lost.
- This allows you to intervene manually if needed, even if automation is set up.
- Set up notifications for important events. Get an alert on your phone if:
- Establishing Maintenance Schedules:
- Use the data to plan garden tasks. If nutrient sensors show low levels, schedule fertilization.
- Track how often batteries need changing.
- Review automation rules periodically. Are they working well? Do they need adjustment based on the season or plant growth stage?
“Research highlights the importance of this step: ‘Use collected data to create automated watering schedules‘ and ‘Adjust lighting and climate controls based on plant needs.‘ This active use of data is what makes smart gardening truly effective.”
Following these steps will guide you through setting up and running your very own smart garden, leveraging IoT Technology for better home gardening.
Maximizing Sustainable Agriculture Principles with IoT Technology
We’ve seen how IoT Technology in your smart garden mirrors practices in sustainable agriculture. Now let’s focus on how to actively use your smart system to make your home gardening as eco-friendly as possible. It’s about using that data wisely.
Using IoT Data for Resource Efficiency:
- Water Optimization: This is often the biggest win.
- Analyze Soil Moisture Trends: Don’t just rely on the current reading. Look at the graphs in your app. How fast does your soil dry out after watering or rain? This helps fine-tune your watering amount and frequency.
- Zone Your Watering: Use data from multiple soil sensors to confirm that different areas of your garden have different watering needs. Adjust automated irrigation zones accordingly. Maybe your sunny spot needs water more often than the shady corner.
- Integrate Weather Data: If your system allows, connect it to local weather forecasts. Smart irrigation controllers can automatically skip watering schedules if rain is expected (saving water) or increase watering during heatwaves (protecting plants).
- Smart Fertilizer Use:
- Base Application on Data: If you have nutrient soil sensors, only apply fertilizer when the readings show a deficiency for the specific nutrients your plants need. Avoid “just in case” fertilizing.
- Targeted Application: Apply fertilizer directly to the areas or plants that need it, rather than broadcasting it everywhere. This reduces waste and runoff.
- Monitor pH: Soil pH affects how well plants can absorb nutrients. Use pH sensor data to amend the soil if needed, making existing nutrients more available and potentially reducing the need for extra fertilizer.
- Energy Conservation:
- Automated Timing: Use smart plugs connected to grow lights, pumps, or greenhouse heaters/fans. Set schedules based on sensor data (light levels, temperature, humidity) rather than simple timers. For example, only turn on grow lights when ambient light is insufficient. Only run fans when humidity is high.
- Optimize Placement: Use climate monitor data (light, temperature) to ensure plants are placed in naturally suitable spots, reducing the need for artificial light or temperature control. Consider using solar energy tax credits to make your smart garden even more sustainable and cost-effective in the long run.
Examples and Metrics:
“The impact can be significant. Research shows that ‘Smart gardening systems can significantly reduce resource waste. For example, IoT-driven irrigation can cut water usage by up to 50% while improving plant health.‘ Imagine cutting your garden water bill in half while having healthier plants! That’s the power of IoT Technology applied to sustainable agriculture principles at home.”
Actionable Sustainability Tips:
- Deep Dive into Water Data: Regularly review your water usage reports if your irrigation system provides them. Are there trends? Could you reduce watering duration slightly without impacting soil moisture goals?
- Use Climate Data for Planting: When adding new plants, use your historical climate data (temperature ranges, light levels) from your monitors to choose species that will naturally thrive in your smart garden conditions. This minimizes stress and the need for interventions.
- Track Growth vs. Inputs: Correlate your plant growth and health (visual observation, yield) with the sensor data and your water/fertilizer inputs. Are you getting good results efficiently? This helps optimize your smart gardening strategy over time.
By actively using the data from your IoT devices, you move beyond simple automation. You turn your smart garden into a truly efficient and sustainable ecosystem, making home gardening a more responsible practice.
Troubleshooting Common Smart Garden Challenges
Even the smartest gardens can hit a snag. IoT Technology involves networks, batteries, and sensors exposed to the elements, so issues can pop up. Here’s how to tackle common problems in your smart garden.
Connectivity Issues
One of the most frequent problems is devices losing connection to your network or app.
- Diagnosis:
- Check your home WiFi. Is it working for other devices? Reboot your router if necessary.
- Check the device’s status light or app. Does it indicate a connection problem?
- How far is the device from your router? WiFi signals weaken over distance, especially through walls or outdoors.
- Solutions:
- Move Router/Device: If possible, move your WiFi router closer to the garden area, or move the IoT device (like a controller hub) closer to the router.
- WiFi Extender/Mesh System: Install a WiFi range extender or a mesh WiFi system to boost the signal strength in your yard. Look for outdoor-rated extenders if needed.
- Check Frequency: Ensure the device is connecting to the correct WiFi band (most IoT devices use 2.4GHz, which has longer range than 5GHz).
- Alternatives:
- Bluetooth: If it’s a Bluetooth device, ensure your phone is within range (usually around 30 feet / 10 meters) when you need to sync data.
- Cellular/LoRaWAN: For very large areas or remote gardens with no WiFi, some advanced (and usually more expensive) systems use cellular data or Long Range Wide Area Networks (LoRaWAN), but this is less common for typical home gardening.
Device Malfunctions
Sometimes, a specific IoT device like a soil sensor stops working correctly.
- Troubleshooting Sensors:
- Unresponsive: Check the battery first (see below). Clean the sensor probe – dirt or corrosion can interfere with readings. Try restarting the device (remove battery, wait a minute, replace). Try removing and re-adding the device in the app.
- Inaccurate Readings: Ensure the sensor is placed correctly in the soil, making good contact. Check if it needs recalibration (see Data Interpretation section). Compare readings with another sensor or a manual test kit if possible.
- Battery Maintenance:
- Most sensors run on batteries. Check battery levels regularly in the app (if reported) or set reminders.
- Use the recommended battery type (e.g., Lithium batteries often perform better in cold weather).
- Replace batteries promptly when low. Weak batteries can cause connection issues or inaccurate readings before the device dies completely.
- Weatherproofing:
- Outdoor IoT devices face rain, sun, heat, and cold. Ensure you buy devices rated for outdoor use (check the IP rating for water/dust resistance).
- Protect non-weatherproof components (like some controllers or hubs) by placing them in a sheltered spot or a waterproof enclosure.
- Extreme temperatures can affect battery life and sensor accuracy. Check the device’s operating temperature range.
Data Interpretation Challenges
The data is only useful if you understand it. Sometimes readings might seem strange.
- Abnormal Readings vs. Errors:
- Is a sudden spike or drop realistic? (e.g., soil moisture dropping to 0% instantly is likely an error). Check for physical issues first (dislodged sensor, low battery).
- Compare with other nearby sensors or historical trends. Is the reading consistently off, or just a temporary blip?
- Consider environmental factors. Did it just rain heavily (high moisture)? Was there a sudden frost (low temp)?
- Recalibrating Soil Sensors:
- If you suspect consistent inaccuracy in pH or nutrient soil sensors, check the manual for recalibration procedures. This often requires specific solutions.
- Moisture sensors usually don’t need calibration, but their readings can be affected by soil type (clay vs. sand). Some apps let you specify soil type for better accuracy. Learn what readings correspond to “dry,” “moist,” and “wet” in *your specific soil*.
- Finding Normal Ranges:
- Research the specific needs of your plants. What is the ideal soil moisture range? Preferred pH? Temperature limits?
- Many gardening websites, university extension sites (.edu), and plant databases provide this information. Some smart garden apps have built-in plant libraries. Keep notes for your specific plants.
System Integration Problems
Getting different IoT devices or apps to work together smoothly can be tricky. For a broader approach to eco-conscious living, consider how sustainable tech powers a greener future in all aspects of life.
- Incompatible Devices/Apps:
- Not all smart garden devices work with all smart home platforms (Alexa, Google Home, etc.) or even with each other. Check compatibility *before* buying.
- Sometimes software updates can break integrations. Check for app updates and device firmware updates regularly.
- Workarounds:
- Use platforms like IFTTT (If This Then That) if your devices are supported. IFTTT can create links between devices/services that don’t natively integrate (e.g., “If Netatmo detects rain, then tell Rachio to skip watering”).
- Focus on using the manufacturer’s app for core functions if broader integration is problematic.
- Manual Backup:
- Automation is great, but always know how to operate things manually. How do you turn on your sprinklers if the app or controller fails?
- Regularly check on your garden visually, even with a smart system. Technology can fail, but your own eyes can spot problems like pests or diseases that sensors might miss.
Troubleshooting is a normal part of using IoT devices. By tackling these common issues systematically, you can keep your smart garden running smoothly.
Future Trends in IoT-Driven Smart Gardening
The way IoT Technology is changing smart gardening is just the beginning. Exciting new developments are on the horizon, promising even smarter, easier, and more productive home gardening. As battery technology advances for EVs, similar innovations can enhance the efficiency and longevity of smart garden devices.
Emerging Technologies:
- AI-Assisted Plant Care: Imagine an app that doesn’t just show data, but uses Artificial Intelligence (AI) to analyze it. Future systems could:
- Diagnose plant diseases or pest infestations from sensor data patterns or camera images.
- Provide highly specific advice tailored to your garden’s unique conditions and plant growth stages.
- Predict potential problems before they become serious.
- Optimize resource use with even greater precision based on predictive A.I. modeling.
- Drone Monitoring: For larger home gardens or small homesteads, drones equipped with specialized cameras (like multispectral cameras) could become useful. They could fly over the garden to:
- Quickly assess plant health across large areas.
- Identify variations in soil conditions or water stress.
- Create detailed maps for precision management.
- Robotics Integration: We might see small robots helping with tasks like:
- Automated weeding using computer vision.
- Precise application of fertilizers or pesticides by robotic arms.
- Even automated harvesting for certain types of produce in home settings.
- Vertical Smart Gardens: As more people live in cities with limited space, smart gardening technology will increasingly be applied to vertical farms and indoor growing systems. Innovations could include:
- Highly optimized LED lighting systems that adjust spectrum and intensity based on plant needs.
- Closed-loop hydroponic or aeroponic systems with fully automated nutrient and water management using IoT sensors.
- Compact, stackable units perfect for apartments, integrating seamlessly with smart home ecosystems.
“Research supports this outlook: ‘As technology advances, we can expect to see AI-powered gardening assistants and drone-based monitoring systems becoming more common in home gardens.’ These advancements will likely make smart gardening even more powerful and accessible.”
Preparing for the Future:
Investing in basic IoT Technology for your garden now, like soil sensors and smart controllers, helps you get comfortable with the concepts of data-driven gardening. Learning to use current apps and interpret data prepares you for adopting these more advanced future tools. The skills you build managing your current smart garden are foundational for embracing the next wave of smart gardening and sustainable agriculture innovations at home. The future of gardening is connected, intelligent, and more sustainable than ever before.
Conclusion: Embrace the Future of Smart Gardening
We’ve journeyed through the exciting world where IoT Technology meets the soil. It’s clear that these advancements are doing more than just adding gadgets to our gardens; they are fundamentally transforming traditional home gardening into data-driven, efficient smart gardening.
By connecting sensors and automated systems, IoT Technology takes the guesswork out of plant care. It empowers gardeners of all skill levels to provide optimal conditions for their plants, leading to healthier growth and better yields.
More importantly, smart gardening aligns technology with sustainability. It enables precise resource management, significantly reducing water waste and minimizing the need for excess fertilizers. This reflects the best practices of large-scale sustainable agriculture, bringing eco-friendly gardening right into our homes.
“Don’t feel overwhelmed by the technology. Starting your smart garden journey can be simple.”
Begin with basic soil sensors to understand your garden’s moisture needs. As you grow comfortable, you can gradually expand your system with automated irrigation or climate monitors.
Embrace the innovation! IoT Technology offers incredible potential to make home gardening more rewarding, productive, and kinder to our planet. Create your own smart garden, and watch your green thumb get even greener.
FAQ
Q: What is the main benefit of using IoT in gardening?
A: The main benefit is data-driven plant care. Sensors provide real-time information about soil conditions, climate, and plant needs, allowing for precise watering, fertilization, and environmental control. This leads to healthier plants, resource conservation (especially water), and reduced manual labor through automation.
Q: Is smart gardening expensive to set up?
A: It can be, but it doesn’t have to be. You can start small with a basic soil moisture sensor for under $50. More comprehensive systems with multiple sensors and automated irrigation controllers will cost more, ranging from a hundred to several hundred dollars. Plan based on your budget and needs, and expand gradually.
Q: Do I need strong technical skills for a smart garden?
A: Basic tech comfort is helpful, similar to setting up other smart home devices. Most devices come with user-friendly apps and instructions for connecting to WiFi and configuration. Installation might range from simply sticking a sensor in the ground to basic wiring for irrigation controllers (which might require professional help if you’re uncomfortable).
Q: Can I integrate smart garden devices with my existing smart home system (like Alexa or Google Home)?
A: Often, yes. Many smart garden devices are designed to be compatible with popular smart home platforms. Always check the product specifications for compatibility *before* purchasing if integration is important to you.
Q: What is the most important IoT device to start with for a smart garden?
A: A reliable soil moisture sensor is generally considered the best starting point. Understanding your soil’s water content is crucial for plant health and is the foundation for optimizing watering, whether done manually based on sensor readings or automatically with a smart irrigation system.
What’s Your Smart Garden Story?
Have you already started using IoT Technology in your garden? What smart gardening tips or experiences can you share? Let us know in the comments below!
Connecting with fellow tech-savvy gardeners can be helpful. Consider joining online forums or social media groups dedicated to IoT-based gardening or smart home automation. If you are interested in other smart home automations for efficient living explore practical guides here.
If you’re looking for specific product recommendations to start your smart garden, check out reviews for entry-level soil sensors or smart watering timers.
Got questions about setting up IoT Technology in your own garden? Ask away in the comments – we’re happy to help you get started on your smart gardening path!
1 Comment
Comments are closed.