Follow Us

published

in

The Complete Guide to Renewable Energy Installation for Your Home: Your Path to Savings with Home Solar

Estimated Reading Time: 18 minutes

Key Takeaways

    • Accessibility & Affordability: Home solar and **renewable energy installation** have become much more accessible and **affordable** due to falling costs and incentives like the 30% Federal Tax Credit.


    • Benefits: Switching to **home solar** offers significant environmental benefits (reducing carbon footprint), financial advantages (lower bills, increased home value), and energy independence (less grid reliance, potential outage protection with batteries).


    • Suitability Assessment: Key factors determining if your home is right for solar include roof orientation (south-facing is ideal), minimal shading, roof condition/age, available space, and understanding your annual energy consumption (kWh).


    • DIY vs. Pro: **DIY solar** using **solar panel kits** can save significantly on labor costs but requires substantial technical skill, time, and adherence to safety protocols. Professional **solar panel installation** offers speed, expertise, safety, and warranties but comes at a higher upfront cost.


    • Incentives are Crucial: Leveraging the Federal ITC, state/local rebates, SRECs (where applicable), and net metering significantly reduces the net cost, making **home solar** a viable investment.


  • Maintenance is Minimal: Solar systems require little upkeep beyond occasional cleaning and monitoring performance, ensuring longevity and optimal energy production.
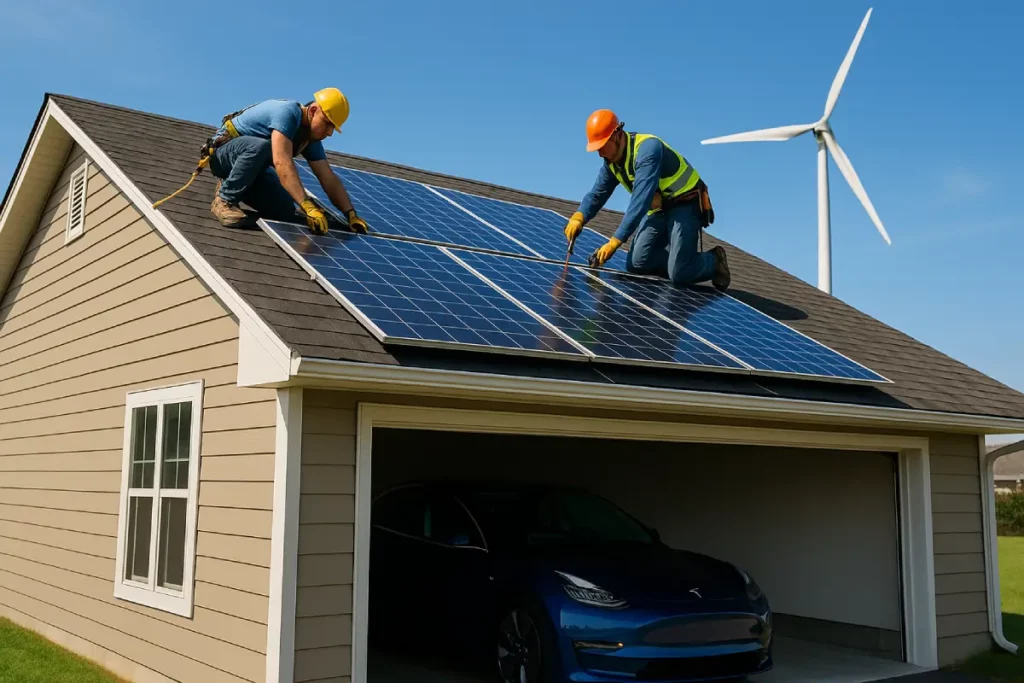
The Complete Guide to Renewable Energy Installation for Your Home: Your Path to Savings with Home Solar

Have you noticed more solar panels popping up in your neighborhood? You’re not alone! Residential renewable energy installation has seen huge growth, with solar energy capacity in the U.S. increasing significantly year over year. This surge shows that home solar is no longer just for the wealthy or tech-savvy; it’s become much more accessible and affordable for regular homeowners like you.

This guide is your practical handbook. We won’t just talk about solar power; we’ll walk you through making real decisions about setting up your own system, especially using solar panel kits. We aim to give you the clear information you need to choose the right path, whether that’s a hands-on DIY solar project or working with professionals.

“Imagine taking control of your energy bills and reducing your environmental impact simultaneously. That’s the power of home solar.”

We’ll cover everything from checking if your home is suitable for solar, understanding the parts involved, figuring out costs, and the actual steps of installation. You’ll also learn how going solar helps the planet by reducing your carbon footprint and saves you money in the long run.

Research Finding: Home solar reduces your carbon footprint and provides long-term financial savings.

Let’s begin your journey to energy independence and lower electricity bills!

Section 1: The Many Benefits of Home Solar Systems and Renewable Energy Installation

Switching to home solar power is a smart move for many reasons. It helps the planet, your wallet, and gives you more control over your energy. Let’s look closer at these advantages.

Environmental Benefits

  • Cleaner Air: Solar panels create electricity without burning fossil fuels like coal or natural gas. This means no harmful greenhouse gases are released into the air.
  • Fighting Climate Change: A typical home solar system can offset about 4-5 tons of carbon dioxide emissions each year. That’s like planting over 100 trees annually! This renewable energy installation directly helps combat climate change.
  • Conserving Water: Traditional power plants use massive amounts of water for cooling. Solar power uses virtually no water to generate electricity.

Financial Advantages

  • Lower Electric Bills: Once your solar system is running, the electricity it generates is free. Many homeowners see their monthly electric bills drop dramatically, sometimes close to zero. Average savings can range from $50 to over $200 per month, depending on your system size and energy use.
  • Good Return on Investment (ROI): While there’s an upfront cost, home solar systems usually pay for themselves over time through bill savings. The typical ROI timeline is often between 8 to 12 years, but with incentives, it can be even shorter. After that, the savings are pure profit.
  • Increased Property Value: Homes with solar panels tend to sell faster and for a higher price than those without. Studies suggest a potential increase of around 4% or more in home value. Buyers appreciate the built-in savings and eco-friendly aspect.
  • Affordable Solar Options: Thanks to falling panel prices and government help, solar is more affordable than ever.

Energy Independence

  • Less Grid Reliance: Generating your own power means you depend less on the traditional utility grid.
  • Protection from Price Hikes: Electricity prices tend to go up over time. With solar, you lock in your energy costs and are protected from these increases.
  • Power During Outages (with Batteries): If you add battery storage to your solar system, you can keep your lights on even when the grid goes down during storms or other emergencies.

Government Incentives

  • Federal, state, and local governments often offer tax credits, rebates, and other programs to encourage renewable energy installation. These incentives significantly reduce the net cost, making affordable solar a reality for more people. (We’ll cover these in detail later!) [More details on solar tax benefits and incentives]

Research Finding: Solar power shields homeowners from future electricity price increases.

Section 2: Is Your Home Right? Assessing Your Home’s Solar Potential

Before dreaming of zero-dollar electric bills, it’s crucial to check if your home solar dreams can become a reality. Not every house is perfectly suited for solar panel installation. Here’s a detailed checklist to help you assess your home’s potential:

Your Home Solar Suitability Checklist

  • Roof Orientation:
    • Ideal: In the Northern Hemisphere (like the US and Europe), a south-facing roof gets the most direct sunlight throughout the day, maximizing electricity production.
    • Acceptable: East or west-facing roofs can still work, though they might produce 15-20% less energy than a south-facing one. You might need a slightly larger system to compensate.
    • Avoid: North-facing roofs generally receive too little direct sun for effective solar panel performance.
  • Roof Angle (Pitch):
    • Ideal: A roof slope between 30 and 45 degrees is often considered best for maximizing sun exposure year-round.
    • Workable: Most standard roof pitches can accommodate solar panels. Flat roofs can also work using tilted mounting systems, though these might add slightly to the cost.
  • Shade Analysis:
    • Crucial: Even small amounts of shade on your panels can significantly reduce energy output. Look for obstructions like tall trees, chimneys, neighboring buildings, or antennas that could cast shadows on your roof, especially during peak sunlight hours (usually 9 am to 3 pm).
    • Tools: You can use online mapping tools (like Google Sunroof Project, where available) or specialized apps (solar pathfinders) to get a basic idea of shading. A professional installer will perform a detailed shade analysis.
  • Roof Condition and Structure:
    • Age & Material: Is your roof relatively new (less than 10-15 years old)? Solar panels are designed to last 25+ years. If your roof needs replacing soon, it’s best to do that before installing panels to avoid the extra cost of removing and reinstalling them later. Asphalt shingles, metal, and tile roofs are generally compatible.
    • Strength: Your roof structure must be strong enough to support the added weight of the panels and mounting hardware (usually around 2-4 pounds per square foot). An engineer or qualified installer should confirm this.
  • Available Roof Space:
    • You need enough unshaded space to fit the number of panels required for your energy needs. Each panel is typically about 3.5 feet by 5.5 feet. Local fire codes also require clear pathways around panels.
  • Local Climate:
    • Sunlight Hours: Areas with more sunny days per year will naturally generate more solar power. However, solar panels still work on cloudy days, just less efficiently. Even cooler, sunny climates can be excellent for solar, as panels work better in moderate temperatures.
    • Snow/Wind: Consider how much snow your area gets (panels need to be cleared or tilted enough for snow to slide off) and typical wind speeds (mounting needs to be secure).

Calculate Your Energy Needs

Before sizing a system, understand how much electricity you currently use.

  1. Gather Utility Bills: Collect your electric bills from the past 12 months.
  2. Find Kilowatt-Hours (kWh): Look for your monthly energy consumption, usually listed in kWh.
  3. Calculate Annual Use: Add up the kWh from all 12 bills to get your total annual energy consumption. This number is key for determining how many solar panels you’ll need.

Use Online Solar Calculators

Many online tools can provide a preliminary estimate of your home’s solar potential and potential savings. Search for “solar panel calculator” or “home solar estimator.” These tools often ask for your address, average electric bill, and roof details to give you a rough idea.

Expert Tip: “Don’t forget to check local zoning laws and any Homeowner Association (HOA) restrictions regarding solar panel installation. Some areas might have specific rules about placement or appearance. Before you assess your home’s suitability for solar, it’s also beneficial to perform a [Step-by-step guide to perform a home energy audit] (Placeholder link) to understand your current energy consumption and identify potential energy leaks, making your home more efficient before installing solar panels.”

By carefully evaluating these factors, you can determine if a home solar system is a practical and beneficial investment for your property, paving the way for a successful solar panel installation.

*(Research Points: Assessing roof condition, orientation, sunlight exposure, local zoning laws, and current energy consumption are vital preliminary steps – based on plan instructions)*

Section 3: What’s Inside? Understanding Solar Panel Kits and Components

If you’re considering the DIY solar route, solar panel kits are often the starting point. [Top Solar Panel Kit Reviews] (Placeholder link) These kits bundle the main components you need, making the process potentially more straightforward and often more affordable than sourcing everything separately. But what exactly comes in a typical kit?

Key Components of a Solar Panel Kit

A standard solar panel kit usually includes:

  • Solar Panels (Photovoltaic Modules): These are the heart of the system, capturing sunlight and converting it into direct current (DC) electricity. You can choose between different types, such as [Detailed comparison of solar panel types and efficiency] (Placeholder link).
    • Monocrystalline Panels: Made from single-crystal silicon, they are generally more efficient (meaning they produce more power per square foot) and have a sleek black appearance. They often cost slightly more.
    • Polycrystalline Panels: Made from multiple silicon fragments melted together, they are slightly less efficient and usually have a blue, speckled look. They are typically less expensive.
  • Inverters: Solar panels produce DC electricity, but your home and the grid use alternating current (AC). The inverter converts DC to AC. There are several types:
    • String Inverters: The most common and cost-effective type. Multiple panels are connected in series (a “string”), feeding into a single, central inverter. If one panel is shaded or underperforming, it can affect the output of the entire string.
    • Microinverters: A small inverter is attached to the back of each individual panel. They convert DC to AC right at the panel. This optimizes performance for each panel, making them great for roofs with partial shading issues. They are generally more expensive upfront.
    • Power Optimizers: These are a hybrid approach. Optimizers are attached to each panel to condition the DC power before sending it to a central string inverter. They offer panel-level optimization similar to microinverters but can be slightly less costly.
  • Mounting Hardware (Racking): This is the framework that securely attaches the solar panels to your roof (or the ground, for ground-mounted systems). It includes rails, clamps, brackets, and flashing to prevent leaks. The type of hardware depends on your roof material (shingles, tile, metal, flat).
  • Wiring and Connectors: Special UV-resistant cables (like MC4 connectors) are used to connect the panels to each other, to the inverter, and ultimately to your home’s electrical system.
  • Charge Controllers (Often in Off-Grid or Battery Kits): If your kit includes battery storage, a charge controller is essential. It regulates the voltage and current coming from the panels to prevent overcharging the batteries.
  • Batteries (Optional, but Increasingly Popular): Solar batteries store excess energy generated during the day for use at night or during power outages. Common types include lithium-ion batteries. [In-depth analysis of home battery solutions] (Placeholder link) Adding batteries increases system cost and complexity but provides energy security.
  • Monitoring System: Most modern systems include monitoring hardware or software. This allows you to track your system’s energy production in real-time via a web portal or mobile app, helping you see your savings and spot any potential issues.

Comparing Solar Panel Kit Options

Solar panel kits come in various sizes and configurations:

  • Small Starter Kits (1-3 kW): Good for offsetting a portion of your energy use, powering specific appliances, or for smaller homes/cabins. Often more manageable for DIY solar beginners.
  • Medium Kits (4-8 kW): Suitable for average-sized homes with moderate energy consumption. These are the most common size range for residential installations.
  • Large Kits (9+ kW): Designed for larger homes, homes with high electricity usage (like those with electric vehicles or pools), or homeowners aiming for near-complete energy independence.
  • Grid-Tied Kits: The most common type. These systems are connected to the utility grid. Excess power you generate can often be sent back to the grid for credit (net metering).
  • Off-Grid Kits: Designed for locations without utility access. These always include batteries and charge controllers, as you rely entirely on solar power and storage. They require careful energy management.
  • Grid-Tied with Battery Backup (Hybrid): Combines the benefits of grid connection with the security of battery storage for power outages.

Price Ranges for Solar Panel Kits

Costs vary widely based on size, component quality, and whether batteries are included. Here are rough estimates (excluding installation labor):

  • Small Kits (1-3 kW): $2,000 – $6,000
  • Medium Kits (4-8 kW): $7,000 – $15,000
  • Large Kits (9+ kW): $15,000+
  • Adding Batteries: Can add $5,000 – $15,000+ depending on capacity.

Keep in mind these are kit costs only. Permits, additional wiring, safety equipment, and potential structural upgrades are extra, especially for a DIY solar project. Choosing the right kit depends on your budget, energy goals, and technical comfort level. An affordable solar solution often starts with a well-chosen kit.

Research Finding: A typical solar panel kit includes solar panels, inverters, mounting hardware, and wiring/connectors.

Section 4: DIY Solar vs. Professional Solar Panel Installation – Making the Right Choice

One of the biggest decisions you’ll make is whether to tackle the solar panel installation yourself (DIY solar) or hire professionals. Both paths have pros and cons, and the right choice depends heavily on your skills, budget, time, and comfort level with electrical work and heights. Making affordable solar a reality might lean you towards DIY, but safety and correctness are paramount.

DIY vs. Professional Installation: A Comparison

FeatureDIY Solar InstallationProfessional Solar Panel Installation
CostLower upfront cost (save on labor, typically 30-50% less)Higher initial expense (includes labor, design, permits)
ControlFull control over component selection and timelineLess direct control, rely on contractor’s choices/schedule
TimelineCan be much longer; dependent on your free time & learningUsually faster (typically 1-3 days for physical install)
Technical SkillsRequires significant electrical knowledge, roofing skillsNo technical skills needed by homeowner
SafetyHigher risk (working at heights, high voltage electricity)Professionals trained in safety protocols, insured
Permits/InspectionHomeowner responsible for obtaining and passingContractor usually handles all permits and inspections
WarrantyOnly manufacturer warranties on componentsWarranties often cover workmanship/installation + components
TroubleshootingYou are responsible for diagnosing and fixing issuesContractor often provides support and maintenance options
Long-Term MaintenanceYour responsibilityMay offer maintenance packages

When Does DIY Solar Make Sense?

DIY solar can be a great option if:

  • You have strong electrical and construction skills (electrician or experienced contractor background is ideal).
  • You are comfortable working safely on your roof.
  • You have plenty of time to dedicate to research, planning, permitting, and installation.
  • You prioritize saving the maximum amount on upfront costs (aiming for truly affordable solar).
  • You enjoy hands-on projects and learning new technical skills.
  • Your project is relatively small and straightforward (e.g., a small grid-tied system or an off-grid shed).

When is Professional Solar Panel Installation Recommended?

Hiring professionals is generally the better choice if:

  • You lack electrical or roofing experience.
  • Safety is your absolute top priority.
  • You want the project completed quickly and efficiently.
  • You prefer comprehensive warranties covering both parts and labor.
  • Your roof is complex (steep pitch, unusual materials, multiple levels).
  • You want the convenience of having someone else handle permits, inspections, and paperwork.
  • You are installing a large or complex system, especially one with battery backup.

DIY Capability Self-Assessment

Answer these questions honestly:

  1. Do you have documented experience working with home electrical systems (beyond changing a light fixture)? (Yes/No)
  2. Are you comfortable and skilled working safely on ladders and your roof for extended periods? (Yes/No)
  3. Can you accurately read technical diagrams and follow complex installation manuals? (Yes/No)
  4. Do you have the physical ability to lift and maneuver heavy solar panels (around 40-50 lbs each)? (Yes/No)
  5. Are you prepared to navigate the local permit application and inspection process? (Yes/No)
  6. Do you own or have access to the necessary tools (drills, torque wrenches, safety harnesses, multimeter, etc.)? (Yes/No)
  7. Do you have significant free time (potentially multiple weekends or weeks) to dedicate to this project? (Yes/No)

If you answered “No” to several of these questions, professional installation is likely the safer and more practical route.

Warning: “Working with electricity is dangerous and can cause serious injury or death if not done correctly. Working on roofs carries the risk of falls. Always prioritize safety. If you have any doubts, hire a qualified professional for your solar panel installation.”

Research Finding: Professional installation is often safer and more efficient for complex or large-scale projects.
Research Finding Comparison: DIY offers lower costs and greater control but requires technical knowledge, while professional installation has a higher initial expense but ensures proper installation, includes warranties, and handles complexity.

Section 5: Step-by-Step DIY Solar Installation Guide

Decided to take the plunge into DIY solar? Congratulations! This section provides a general overview of the solar panel installation process using solar panel kits. Remember, this is a guide, not a substitute for manufacturer instructions, professional advice, or local code requirements. Safety first, always!

Step 0: Preparatory Work (Don’t Skip!)

Before you touch a panel or drill a hole:

  1. System Design & Permits:
    • Finalize your system design (panel layout, wiring diagram, component list). This might require engineering sign-offs in some areas.
    • Apply for Permits: Contact your local building department. You’ll likely need electrical and building permits. This process can take weeks or months, so start early! Understand all requirements, including potential HOA approvals.
  2. Gather Tools & Safety Equipment:
    • Safety Gear: Hard hat, safety glasses, work gloves, non-slip footwear, fall protection harness (essential for roof work!).
    • Basic Tools: Drills, drill bits, socket set, wrenches (including a torque wrench), level, tape measure, stud finder, chalk line, utility knife.
    • Electrical Tools: Multimeter (for voltage checks), wire strippers, crimpers, fish tape (for conduit).
    • Ladders or scaffolding.
  3. Site Preparation:
    • Ensure your roof is clean and in good condition (address any repairs before starting).
    • Plan your layout on the roof using chalk lines. Mark rafter locations accurately using a stud finder.
    • Prepare a safe staging area on the ground for panels and equipment.

(Expected Time: Weeks to Months for permits and planning)

The Installation Process: Step-by-Step

(Note: Diagrams mentioned in the plan cannot be visually included here, but imagine clear illustrations for each step.)

  1. Install Mounting System (Racking):
    • Locate roof rafters accurately. Mounting feet must be bolted securely into rafters.
    • Install flashing under shingles around each penetration point to prevent leaks. Seal thoroughly with roofing sealant.
    • Attach mounting feet to the rafters using lag bolts torqued to specification.
    • Install rails onto the mounting feet, ensuring they are level and parallel.
    • (Timeline: 1-2 days, depending on system size and roof complexity)
    • Safety: Use fall protection! Double-check waterproofing.
  2. Place and Secure Solar Panels:
    • Carefully transport panels to the roof (this often requires two people).
    • Place panels onto the rails according to your layout plan.
    • Secure panels to the rails using the specified mid-clamps and end-clamps. Torque clamps correctly – too loose and panels can shift, too tight and you could damage the panel frame.
    • Install grounding hardware (grounding lugs/clips) to create a continuous ground path connecting all panel frames and racking components.
    • (Timeline: 1 day)
    • Safety: Panels are bulky. Lift properly. Secure panels immediately.
  3. Connect Electrical Components (Wiring):
    • Panel Wiring (DC): Connect panels together in series (“strings”) using the pre-attached MC4 connectors. Secure wiring neatly under the panels using UV-resistant wire clips. Avoid letting wires sag or rest directly on the roof surface.
    • Run the DC output wires from the strings down to where your inverter will be located, typically using conduit for protection.
    • (Timeline: 1 day)
    • Safety: Ensure panels are not producing power during wiring (e.g., cover them or work in low light, though extreme caution is always needed). Double-check polarity (+ and -).
  4. Install Inverter(s) and Safety Disconnects:
    • Mount the inverter(s) in a cool, shaded, accessible location (often near your main electrical panel, but check manufacturer specs).
    • Mount required DC and AC safety disconnect switches near the inverter and/or main panel as required by code. These allow you to safely shut down the system.
    • (Timeline: 0.5 – 1 day)
  5. Wire System to Home Electrical Panel (AC Connection):
    • THIS IS THE MOST DANGEROUS STEP. HIRE A LICENSED ELECTRICIAN IF UNSURE.
    • Run AC wiring from the inverter output, through the AC disconnect switch, to a dedicated circuit breaker in your home’s main electrical panel.
    • Connect the system’s grounding wire to your home’s grounding system.
    • (Timeline: 0.5 – 1 day – Strongly consider professional help here)
    • Safety: TURN OFF MAIN BREAKER before opening the panel. Use extreme caution. Follow all electrical codes precisely.
  6. Battery Setup (If Applicable):
    • Install the battery bank and charge controller according to manufacturer instructions, typically near the inverter.
    • Wire the panels through the charge controller to the batteries, and the inverter to the batteries (specific wiring depends on AC vs DC coupled systems).
    • (Timeline: 1 day)
    • Safety: Batteries store significant energy. Follow handling procedures carefully. Ensure proper ventilation.
  7. System Testing & Commissioning:
    • Before final connection, double-check all wiring and connections with a multimeter.
    • Once confident (and ideally after initial inspection approval), follow the manufacturer’s commissioning procedure to safely energize the system.
    • Set up your monitoring system.
  8. Inspection and Approval:
    • Schedule final inspections with your local building and electrical departments. They will verify the installation meets all code requirements.
    • Receive Permission To Operate (PTO) from your utility company before officially connecting to the grid (for grid-tied systems).
    • (Timeline: Days to weeks, depending on inspector availability and utility processing)

CRITICAL SAFETY PRECAUTIONS:
* Fall Protection: Never work on a roof without proper safety harnesses.
* Electricity: Treat all wires as live unless confirmed dead with a meter. Understand DC and AC risks. Shut off power sources when working.
* Lifting: Panels are heavy and awkward. Use proper lifting techniques and get help.
* Codes: Follow the National Electrical Code (NEC) and all local amendments strictly.
* Instructions: Read and follow all manufacturer instructions for every component.
* When in Doubt, Hire Out: If any step feels beyond your capability, hire a qualified electrician or solar installer.

Research Finding: A general DIY process involves: 1. Design system & get permits, 2. Install mounting, 3. Place panels, 4. Connect electrical components, 5. Wire to home panel, 6. Get inspection. (Source structure link)
Research Finding: Always prioritize safety and consult local regulations throughout the DIY process. (Source structure link)

Section 6: Maximizing Affordability – Incentives, Rebates, and Financing for Your Home Solar Project

Making renewable energy installation truly affordable often involves taking full advantage of financial incentives and smart financing options. Luckily, there are many programs designed to lower the cost of home solar.

Federal Solar Investment Tax Credit (ITC)

  • What it is: This is the most significant incentive available nationwide in the U.S. It allows you to claim a tax credit for a percentage of your total solar system cost (including panels, components, batteries, and installation labor).
  • Current Rate: As of now, the ITC stands at 30% for systems installed between 2022 and 2032. (It’s scheduled to step down after that).
  • How it works: It’s a direct credit, meaning it reduces the amount of federal income tax you owe dollar-for-dollar. If the credit is more than you owe in one year, you can often roll the remainder over to the next year. Consult a tax professional for details specific to your situation.

State-Specific Rebates and Incentives

Many states offer their own programs on top of the federal ITC. These vary greatly, so research is key! Some examples include:

  • Direct Rebates: Some states or utilities offer upfront cash rebates based on system size (e.g., $X per watt installed).
  • State Tax Credits: Similar to the federal ITC, but applied to your state income taxes.
  • Solar Renewable Energy Certificates (SRECs): In some states, you earn SRECs for the solar energy your system produces. You can sell these certificates to utilities (who need them to meet state renewable energy mandates), providing an ongoing income stream. States with strong SREC markets include Massachusetts, New Jersey, Pennsylvania, Maryland, and Washington D.C.
  • Property Tax Exemptions: Many states exempt the added value of your solar system from property taxes.
  • Sales Tax Exemptions: Some states waive sales tax on solar equipment purchases.

(Resource Tip: Search for “[Your State] solar incentives” or check the DSIRE database (Database of State Incentives for Renewables & Efficiency) for detailed local information.)

Utility Company Programs

Your local electric utility might offer additional benefits:

  • Net Metering: This is the most common utility program. When your solar system produces more electricity than you’re using, the excess power flows back to the grid. The utility credits your account for this excess energy, effectively spinning your meter backward. Rules vary by state and utility.
  • Feed-in Tariffs (FiTs): Less common in the US now, FiTs pay you a set rate (often premium) for all the solar electricity your system generates, regardless of whether you use it or send it to the grid.

Financing Your Solar System

If the upfront cost is still a barrier, consider these financing options:

  • Home Equity Loan or HELOC: You borrow against the equity in your home. Interest rates are often relatively low, and the interest paid might be tax-deductible (consult a tax advisor).
  • Solar-Specific Loans: Many banks, credit unions, and specialized lenders offer loans specifically for solar installations. These can be secured (using the panels as collateral) or unsecured. Rates and terms vary.
  • Power Purchase Agreements (PPAs): A solar company installs panels on your roof at little to no upfront cost. You agree to buy the electricity generated by the system from them at a fixed rate, usually lower than the utility rate. The company owns and maintains the system. You don’t own the system or get the tax credits directly.
  • Solar Leases: Similar to a PPA, but you pay a fixed monthly lease payment for the use of the solar system, regardless of how much electricity it produces. The solar company owns and maintains the system. Again, you don’t own the system or benefit directly from tax credits.

“Understanding how incentives and financing mesh together is key to unlocking the most affordable solar solution for your budget.”

Tips for the Most Affordable Solar Solution

  • Get Multiple Quotes: Whether going DIY (for kits) or professional, get quotes from several reputable suppliers or installers.
  • Understand Total Cost: Factor in permits, potential roof upgrades, and any financing costs.
  • Maximize Incentives: Research and apply for every federal, state, and local incentive you qualify for.
  • Right-Size Your System: Don’t oversize excessively unless you plan for future increased usage (like an EV).
  • Consider DIY Carefully: Ensure the potential savings outweigh the risks and time investment for your specific situation.

By combining incentives and smart financing, a home solar system through renewable energy installation can become a very affordable, high-value investment.

Research Finding: Key financial incentives include the 30% Federal Investment Tax Credit (ITC), state/local rebates, net metering programs, and Solar Renewable Energy Certificates (SRECs).
Research Finding: Financing options like solar loans and solar leases/PPAs can make systems accessible with lower upfront costs.

Section 7: Maintenance and Optimization of Your Home Solar System

Your renewable energy journey doesn’t end once the solar panel installation is complete. To ensure your home solar system performs optimally and lasts for its expected 25+ year lifespan, regular maintenance and monitoring are important. Luckily, solar panels generally require minimal upkeep.

Routine Maintenance Schedule

  • Monthly Visual Inspections:
    • Take a quick look at your panels (from the ground, if possible). Check for any obvious dirt buildup, debris (leaves, branches), cracks, or discoloration.
    • Check that the mounting seems secure and nothing looks loose.
    • Glance at your inverter and monitoring system to ensure it’s operating normally (e.g., green lights, expected production levels).
  • Quarterly (or As Needed) Panel Cleaning:
    • Solar panels are often cleaned naturally by rain. However, in dry, dusty areas or places with lots of pollen or bird droppings, cleaning may be necessary.
    • How to Clean: Use plain water from a garden hose, preferably in the morning or evening when panels are cool. For stubborn grime, use a soft brush or cloth with a long extension pole. Avoid harsh detergents or abrasive materials.
    • Safety: If cleaning requires getting on the roof, hire a professional cleaning service unless you have the proper safety equipment and training. Never spray cold water on hot panels, as the temperature difference could potentially damage them.
  • Annual Professional Check-up (Recommended):
    • Consider having a qualified solar technician inspect your system once a year or every few years.
    • They can check electrical connections, torque settings on mounting hardware, inverter health, and overall system performance more thoroughly than a visual inspection.
    • This can help catch potential issues early before they impact production significantly.

Monitoring System Performance

  • Most modern solar panel installation projects include a monitoring system connected via Wi-Fi.
  • Use the accompanying app or web portal regularly (e.g., weekly or monthly) to track your system’s energy production.
  • Look for consistent output levels based on the weather and time of year. A sudden, unexplained drop in production could indicate an issue (e.g., inverter fault, shading problem, damaged panel).
  • Monitoring helps you verify your savings and understand your energy usage patterns.

Troubleshooting Common Issues

  • Low Production: Check for shading, dirty panels, or obvious damage. Check the inverter display for error codes. Consult your monitoring system data for clues.
  • Inverter Error Codes: Note the specific code and consult the inverter manual or contact the manufacturer/installer. Sometimes a simple system reset (following proper shutdown procedures) can resolve temporary faults.
  • No Power: Check if system disconnect switches or the dedicated solar breaker in your main panel have tripped. If unsure why, contact a professional.

System Expansion Possibilities

  • As your energy needs change (e.g., you buy an electric car, add an electric appliance, or build an addition), you might consider expanding your home solar system.
  • Discuss expansion possibilities early on during the initial design phase if you anticipate future needs. Choosing microinverters or power optimizers can make future panel additions easier than with some string inverter setups.
  • Ensure your roof has space and your inverter(s) can handle the additional capacity, or plan for adding another inverter. Adding batteries is also a common upgrade [In-depth analysis of home battery solutions] (Placeholder link).

By performing simple maintenance and keeping an eye on performance, your renewable energy system will reliably generate clean power for decades.

Research Finding: Regular maintenance includes cleaning panels, monitoring system output, and scheduling professional inspections.

Research Finding: Long-term benefits of a well-maintained system include energy independence, lower utility bills, and protection against rising energy costs.

Section 8: Real-World Success Stories and Case Studies in Home Solar

Seeing how others have successfully implemented home solar, especially through DIY solar efforts or achieving affordable solar, can be incredibly motivating. Here are a few diverse examples illustrating different approaches to renewable energy at home:

Case Study 1: The Small Starter DIY System

  • Homeowner: Mark, a tech-savvy hobbyist in Arizona.
  • Goal: Offset some energy use, learn about solar technology, keep costs minimal.
  • System: 2kW DIY solar kit using 6 panels, microinverters, and roof mounting. Purchased an affordable solar kit online.
  • Installation: Mark did the entire installation himself over several weekends, carefully following instructions and local codes. He hired an electrician only for the final main panel connection.
  • Cost: ~$4,000 for the kit + $300 for electrician + $200 permits = $4,500 total upfront. After the 30% federal tax credit ($1,350), the net cost was $3,150.
  • Savings & ROI: System offsets about 30% of his annual electricity use, saving ~$40/month. Estimated ROI is around 6-7 years.
  • Lessons Learned: “Permitting took longer than expected. Wiring the microinverters was straightforward. Definitely needed the electrician for the final tie-in. Feels great generating my own power, even on a small scale.”

Case Study 2: The Average Family Home – Professional Install

  • Homeowner: The Garcia Family in California (2 adults, 2 kids).
  • Goal: Significantly reduce high electric bills, increase home value, use renewable energy.
  • System: 7kW professionally installed system using 20 high-efficiency panels, string inverter with power optimizers, roof-mounted.
  • Installation: Chose a reputable local installer after getting three quotes. The crew completed the physical solar panel installation in 2 days. The company handled all design, permitting, and inspections.
  • Cost: $21,000 total upfront. After the 30% federal tax credit ($6,300) and a state rebate ($1,000), net cost was $13,700. Financed with a low-interest solar loan.
  • Savings & ROI: System offsets ~85% of their annual usage. Monthly savings average $180. Estimated ROI is around 8 years.
  • Lessons Learned: “Getting multiple quotes was key. The peace of mind with professional installation and warranties was worth the extra cost for us. Our bills are so much lower, and the kids are learning about clean energy.”

Case Study 3: Comprehensive System with Battery Storage – DIY Assist

  • Homeowner: Sarah, living semi-rurally in Colorado, experiences occasional outages.
  • Goal: Achieve near energy independence, have backup power, maximize environmental benefit.
  • System: 10kW system with 30 panels, hybrid inverter, and a 15kWh battery storage system. Ground-mounted array due to roof complexity. Combination of DIY solar and professional help.
  • Installation: Sarah purchased a comprehensive kit (solar panel kits including batteries). She did the site prep, trenching for conduit, and assembled the ground mount racking herself (DIY solar elements). She hired a certified solar installer/electrician for panel mounting, all DC/AC wiring, battery connection, and commissioning.
  • Cost: ~$20,000 for kit/components + $8,000 for professional labor/electrical = $28,000 total upfront. After 30% federal tax credit ($8,400), net cost was $19,600.
  • Savings & ROI: System covers over 95% of her usage. Savings ~$220/month, plus priceless security during outages. ROI estimated at 10-11 years, factoring in battery replacement cost down the line.
  • Lessons Learned: “Ground mount was more site work but easier than roof work for DIY. Battery integration adds complexity; glad I hired a pro for the critical electrical parts. Having power when the grid is down is fantastic. This was the best affordable solar path for my specific needs, mixing DIY with expert help.”

These stories show that whether you start small with DIY solar, go for a standard home solar professional install, or design a larger renewable energy system, there are paths to success and significant long-term savings.

Conclusion: Your Journey to Renewable Energy Installation Starts Now

We’ve covered a lot, from understanding the benefits of home solar and assessing your property’s potential, to delving into solar panel kits, weighing DIY solar against professional solar panel installation, navigating the installation steps, maximizing affordable solar through incentives, and maintaining your system.

“The key takeaway? Undertaking a renewable energy installation like home solar is more achievable today than ever before. With careful planning, research, and an honest assessment of your skills and resources, you can successfully harness the power of the sun.”

Your Next Steps: A Simple Decision Flowchart

  1. Interested in Solar? -> YES
  2. Assess Home Suitability (Roof, Shade, Usage): -> LOOKS PROMISING? -> YES
  3. Explore Costs & Incentives: -> FINANCIALLY FEASIBLE? -> YES
  4. Consider DIY vs. Professional:
    • High Technical Skills & Time? -> Consider DIY Solar (Start researching kits, permits)
    • Prefer Safety, Speed, Warranty? -> Lean towards Professional Install (Start getting quotes)
    • Unsure? -> Get quotes from professionals AND price out DIY kits to compare total investment and effort.
  5. Take Action! -> Begin the permitting process OR sign with your chosen installer.

This guide has hopefully provided the detailed, practical information you need to move forward confidently. Whether you choose a full DIY solar adventure or partner with experts, embarking on your home solar project is a powerful step. You’ll not only reduce your carbon footprint and contribute to a cleaner future but also secure significant long-term energy savings and increase your energy independence. For further reading on the broader impact of sustainable technology, explore our article on [Powering a greener future with sustainable tech!].

Don’t let analysis paralysis stop you. Start with the assessment, explore the options, and take the first decisive step on your renewable energy installation journey today!

(Research Finding Reinforcement: Home solar projects are increasingly feasible with proper planning and execution.)
(Research Finding Reinforcement: Take decisive action now to reduce your carbon footprint and secure long-term energy savings.)

FAQ

Q: How much does a typical home solar system cost?
A: Costs vary widely based on system size, location, components, and whether you DIY or hire professionals. After incentives, a typical professionally installed system might range from $10,000 to $25,000 net cost. DIY can be significantly less upfront but requires your labor and expertise. Solar panel kits range from $2,000 (small) to $15,000+ (large). Always get multiple quotes.


Q: How long does it take for a solar system to pay for itself?
A: The average payback period (ROI) is typically 8-12 years, heavily influenced by system cost, electricity rates in your area, sunlight availability, and incentives claimed. In areas with high electricity costs and good incentives, it can be shorter.


Q: Can I really do a DIY solar installation safely?
A: Yes, if you have strong electrical knowledge, construction/roofing skills, are meticulous about following codes and safety procedures (especially fall protection and electrical safety), and have ample time. If you lack experience in these areas or are uncomfortable with heights or high-voltage electricity, professional installation is strongly recommended. Prioritize safety above all else.


Q: What happens if my panels are shaded?
A: Shade significantly reduces energy production. Even partial shading on one panel in a traditional string inverter system can lower the output of the entire string. Microinverters or power optimizers mitigate this by optimizing each panel individually, making them better for partially shaded roofs. Minimizing shade through tree trimming (if possible) or careful panel placement is crucial.


Q: Do solar panels work on cloudy days or in winter?
A: Yes, solar panels still produce electricity on cloudy days, just less than on bright sunny days (often 10-25% of peak output). They also work in cold temperatures; in fact, panel efficiency can slightly increase in cold, sunny weather. Snow cover will block production, so panels may need clearing in heavy snow areas, or be angled steeply for snow to slide off.


Q: Do I need batteries with my home solar system?
A: Batteries are optional for grid-tied systems but are essential for off-grid systems. For grid-tied, batteries provide backup power during outages and can help maximize self-consumption of solar energy, especially if your utility has time-of-use rates or low net metering credits. However, they add significant cost and complexity to the system.

Continue Reading

PECO Power Outage Report: Your Complete Guide for 2025

published

in

PECO Power Outage Report: Your Complete Guide for 2025

Estimated reading time: 8 minutes

Key Takeaways

Multiple reporting options available – mobile app, website, text messaging, and phone

  • The PECO power outage map updates every 15-30 minutes to show real-time service disruptions
  • Register your contact information with PECO before an outage occurs for faster service
  • Your individual outage report helps PECO pinpoint problem areas more efficiently

peco-power-outage-report

When the lights go out unexpectedly, knowing how to quickly report and track a power outage can make all the difference between frustration and peace of mind. For PECO customers across southeastern Pennsylvania, having instant access to outage reporting tools is essential, especially as we face increasingly unpredictable weather patterns in 2025. Whether you’re experiencing a sudden blackout or preparing for potential service disruptions, this comprehensive guide to PECO power outage reporting will ensure you’re never left in the dark.

Why Reporting Outages Matters More Than Ever

Power outages don’t just inconvenience us—they can pose serious challenges to our daily lives, affecting everything from food safety to medical devices and work capabilities. With PECO serving over 1.6 million electric customers in the greater Philadelphia region, every report helps the company identify problem areas faster and restore service more efficiently.

“Your individual outage report could be the crucial piece of information that helps PECO pinpoint the exact location of a problem affecting your entire neighborhood.”

That’s why understanding how to properly report a PECO power outage is more important now than ever before.

Multiple Ways to Report Your PECO Power Outage

PECO has dramatically expanded their reporting options in recent years, giving customers several convenient methods to alert them when the power goes down:

1. The PECO Mobile App: Power in Your Pocket

Perhaps the most powerful tool at your disposal is the PECO mobile app, available for both iOS and Android devices. This intuitive application allows you to:

  • Report outages with just a few taps
  • Receive live notifications about restoration progress
  • View estimated restoration times
  • Access the interactive outage map on the go

The app has become increasingly popular among customers who appreciate real-time updates and the convenience of reporting without having to make a phone call. According to the PECO Connection website, downloading the app before an outage occurs is one of the smartest preparedness steps you can take.

2. PECO’s Official Website: Comprehensive Online Reporting

For those who prefer using a computer or tablet, PECO’s website offers a robust outage reporting system. Here’s how to use it:

  1. Navigate to PECO’s official outage center
  2. Enter either your account number or the phone number associated with your account
  3. Follow the prompts to submit your outage report
  4. Access the interactive outage map for visual status updates

The website interface is particularly useful for checking the PECO power outage map to see if your neighbors are experiencing the same issues. The map is refreshed every 15-30 minutes, providing a near real-time view of affected areas across PECO’s service territory, according to ABC Energy.

3. Text Messaging: Quick and Simple Reporting

For those who prefer text messaging, PECO offers a convenient SMS reporting system. Here’s how to use this increasingly popular option:

  1. First, register your mobile number by texting “ADDOUTAGE” to MYPECO (697376)
  2. Once registered, you can report outages by texting “OUTAGE” to the same number
  3. Check your outage status by texting “STATUS”
  4. Get updates automatically as crews work on your service

This text-based system has proven especially valuable during widespread outages when phone lines may be congested. The PECO Connection notes that this service works even when internet access is compromised.

4. Phone Reporting: The Traditional Approach

For those who prefer speaking with a representative or who don’t have access to digital options, PECO maintains dedicated phone lines for outage reporting:

  • For general electric outages: 1-800-841-4141
  • Alternative customer service line: (800) 494-4000

These numbers connect you to PECO’s automated system, which can recognize your phone number if it’s registered to your account, making the reporting process faster. For natural gas emergencies, these same numbers will direct you to emergency services.

Continue Reading

Ballerina Farm Protein Powder: The Ultimate Farm-to-Shake Solution

published

in

Ballerina Farm Protein Powder for clean taste, simple ingredients, and everyday gains.

Estimated reading time: 8 minutes

Key Takeaways

  • Ballerina Farm Protein Powder combines grass-fed whey, collagen peptides, hemp protein, and bovine colostrum for comprehensive nutrition
  • Now available in convenient single-serving pouches and variety packs for flexible consumption
  • Contains unique ingredients like calf-first bovine colostrum that support immune health and overall wellness
  • Currently only available for shipping within the United States
ballerina-farm-protein-powder
Ballerina Farm Protein Powder: The Ultimate Farm-to-Shake Solution

Ballerina Farm Protein Powder: A Complete Nutritional Powerhouse

In the ever-evolving world of protein supplements, Ballerina Farm Protein Powder has emerged as a standout option for health enthusiasts seeking clean, farm-sourced nutrition. This unique protein blend combines traditional farming wisdom with modern nutritional science to deliver a truly distinctive product in the crowded protein market.

What Makes Ballerina Farm Protein Powder Different?

Unlike conventional protein supplements that often rely on a single protein source, Ballerina Farm has created their “Farmer Protein Powder” with a thoughtful combination of premium ingredients. Each serving delivers a powerful nutritional punch through its carefully selected components.

“What you put in your body matters. Protein shouldn’t just be about quantity—it should be about quality and comprehensive nutrition that works with your body, not against it.”

The foundation of this innovative formula starts with 100% Grass-Fed Whey, which provides a complete profile of essential amino acids crucial for muscle recovery and growth. This high-quality protein source is particularly valuable for anyone looking to maintain or build lean muscle mass while supporting overall health.

But what truly sets Ballerina Farm Protein Powder apart is its inclusion of Collagen Peptides. These specialized protein structures are known to support skin elasticity, strengthen hair and nails, and promote joint health – benefits you won’t find in typical whey-only formulations. Source

The protein blend also features Hemp Protein, which offers a complete amino acid profile and delivers beneficial omega-3 fatty acids. This plant-based addition makes the formula more well-rounded and provides nutrients often missing in conventional protein supplements.

Perhaps most uniquely, Ballerina Farm includes Calf-First Bovine Colostrum in their protein powder. This special substance, the first milk produced by cows after giving birth, contains immune-boosting properties and growth factors that can support overall wellness. Source

Convenient Options for Every Lifestyle

Recognizing that modern consumers value flexibility and convenience, Ballerina Farm has recently expanded their protein powder offerings to include various packaging options.

For those who prefer portion control or need on-the-go solutions, the Single-Serving Pouches provide exactly 24 grams of protein in each convenient packet. These ready-to-mix portions eliminate measuring and make it easy to maintain consistent protein intake whether you’re at home, at work, or traveling. Source

For customers who enjoy variety or are new to the product, Variety Packs allow sampling of different flavors while maintaining the same high-quality protein blend throughout. This gives consumers the freedom to discover their preferences without committing to a single large container. Source

“Convenience shouldn’t mean compromise. Ballerina Farm’s single-serve options ensure you get the same farm-fresh quality whether you’re at home or on the move.”

In exciting news for fans of the brand, Ballerina Farm recently announced the launch of their single-serve and variety bags, further expanding their product line to accommodate diverse consumer needs. This development shows the brand’s commitment to evolving with customer preferences while maintaining their core values of quality and nutrition. Source

Delicious Ways to Use Ballerina Farm Protein Powder

While protein powders have traditionally been associated with simple shakes, Ballerina Farm encourages creative uses of their Farmer Protein Powder through inspiring recipes and suggestions.

The classic Protein Shake remains a popular option, with Ballerina Farm recommending mixing one scoop with your choice of milk or liquid for a quick and nutritious drink. This simple preparation provides an effective way to fuel your body after workouts or as a convenient meal replacement when time is limited. Source

For those looking to expand their protein repertoire, Ballerina Farm offers innovative recipes like their Maple Cinnamon Protein Dip. This delicious creation combines the protein powder with yogurt and other ingredients to create a tasty dip perfect for fruits and pretzels. Such versatile applications make incorporating protein into your daily routine both enjoyable and nutritious. Source

Important Shipping Information

For consumers interested in purchasing Ballerina Farm Protein Powder, it’s important to note that the product is currently available only within the United States. Due to various international shipping restrictions, the Farmer Protein Powder is not available for delivery outside the U.S. at this time. Source

For domestic customers, shipping processes are streamlined and efficient. Non-perishable goods including the protein powder are shipped throughout the week, with delivery typically taking between 2-7 business days depending on your location. This allows most customers to receive their protein powder in a timely manner without extended waits. Source

The Bigger Picture: Why Farm-Sourced Protein Matters

The emergence of Ballerina Farm Protein Powder reflects a growing consumer desire for transparency in protein sources. With increased awareness around food quality, more people are seeking supplements that align with their values regarding sustainable farming and clean ingredient lists. Source

“The future of nutrition isn’t just about what we consume, but how it’s produced. Farm-to-shake products represent a return to fundamentals with modern nutritional understanding.”

The 100% grass-fed whey in Ballerina Farm’s protein powder represents a higher standard of production compared to conventional dairy. Grass-fed cows typically produce milk with higher levels of beneficial nutrients, including omega-3 fatty acids and conjugated linoleic acid (CLA). By choosing grass-fed protein sources, consumers may be getting additional nutritional benefits while supporting more sustainable farming practices.

Similarly, the inclusion of hemp protein showcases Ballerina Farm’s commitment to diverse protein sources. Hemp is considered an environmentally friendly crop that requires minimal pesticides and water while providing complete plant protein. This consideration for both nutritional value and environmental impact demonstrates the brand’s holistic approach to product development. Source

Who Might Benefit from Ballerina Farm Protein Powder?

The unique formulation of Ballerina Farm Protein Powder makes it suitable for various individuals with different health and fitness goals:

  • Athletes and fitness enthusiasts can benefit from the complete amino acid profile provided by the whey protein, supporting muscle recovery and growth. The addition of collagen peptides may provide additional support for joint health—a crucial consideration for those engaging in regular physical activity.
  • Beauty and wellness focused individuals looking for skin, hair, and nail support will appreciate the collagen component, which offers structural support that conventional protein powders typically don’t provide. This makes Ballerina Farm Protein Powder a potential “beauty from within” supplement in addition to its muscle-supporting benefits.
  • Immune health seekers might value the inclusion of bovine colostrum, which contains immunoglobulins and other compounds that may help strengthen natural defenses. This unique ingredient sets Ballerina Farm’s formulation apart from standard protein supplements.

Looking Forward: The Future of Farm-Based Nutrition

As consumer interest in clean, traceable ingredients continues to grow, brands like Ballerina Farm are well-positioned to lead a new category of farm-to-shake protein supplements. Their approach combines traditional farming wisdom with modern nutritional science, creating products that bridge the gap between conventional supplements and whole foods. Source

The recent expansion into variety packs and single-serve options suggests Ballerina Farm is adapting to consumer demands while maintaining their commitment to quality. This evolution may indicate future innovations that could further define the brand’s place in the protein supplement market.

For health-conscious consumers seeking protein powders with transparent sourcing and thoughtful formulation, Ballerina Farm Protein Powder represents an intriguing option worth exploring. With its unique blend of grass-fed whey, collagen peptides, hemp protein, and bovine colostrum, it offers nutritional benefits beyond what typical protein supplements provide. Source

Whether you’re an athlete looking for recovery support, a busy professional seeking convenient nutrition, or someone interested in supporting overall wellness, Ballerina Farm’s innovative approach to protein supplementation offers a farm-fresh alternative to conventional options. Source

FAQ

Q: What makes Ballerina Farm Protein Powder different from other protein powders?
A: Ballerina Farm Protein Powder stands out through its unique combination of 100% grass-fed whey, collagen peptides, hemp protein, and bovine colostrum—creating a more comprehensive nutritional profile than typical protein supplements that often rely on a single protein source.

Q: Is Ballerina Farm Protein Powder available internationally?
A: Currently, Ballerina Farm Protein Powder is only available for shipping within the United States due to international shipping restrictions on certain food products.

Q: How can I use Ballerina Farm Protein Powder beyond basic shakes?
A: Beyond traditional shakes, Ballerina Farm offers recipes for creative applications like their Maple Cinnamon Protein Dip. The protein powder can be incorporated into smoothie bowls, oatmeal, baked goods, and more for versatile nutrition throughout the day.

Q: What are the benefits of the bovine colostrum in this protein powder?
A: Bovine colostrum contains powerful immune factors, growth compounds, and beneficial proteins that may support overall immune function, gut health, and cellular repair—benefits not typically found in standard protein supplements.

Q: How much protein does a serving contain?
A: Each single-serving pouch contains 24 grams of protein from the blend of grass-fed whey, collagen peptides, hemp protein, and bovine colostrum.

Continue Reading

published

in

The Secret Weapon for Amazing Gardens: Properly Prepared Soil for Gardening

Estimated reading time: 8 minutes

Key Takeaways

Unlock the secrets to a thriving garden!

  • Soil Testing is Crucial: Understanding your soil’s pH, nutrient levels, and type is the first step to effective preparation.
  • Organic Matter is King: Adding compost or other organic materials dramatically improves soil structure, water retention, and nutrient availability.
  • Proper Tillage Matters: Loosening compacted soil allows roots, water, and air to penetrate, but avoid over-tilling which can harm soil structure.
  • Amendments Address Specific Needs: Tailor amendments based on your soil test results and type (clay, sand, silt) for optimal balance.
Gardening
Gardening

Hey garden explorers! Are you ready to grow the most amazing flowers, the juiciest tomatoes, or the crunchiest carrots you’ve ever seen? Guess what? The biggest secret isn’t just sunshine and water – it’s what’s hiding right under your feet! We’re talking about properly prepared soil for gardening, and this week, we’re diving deep into the exciting world beneath the surface to show you exactly how to get your garden bed ready for planting success.

Think of your garden soil like the perfect bed for your plants. If it’s comfy, cozy, and full of yummy food (nutrients!), your plants will be happy and grow big and strong. But if it’s hard, lumpy, or doesn’t have the good stuff plants need, they might struggle.

Getting the soil just right is like giving your future plants a superhero head start! It’s the most important mission you’ll undertake before planting a single seed…

…and trust us, it’s an adventure worth taking. Get ready to transform your patch of earth into a thriving paradise! Let’s grab our shovels and uncover the secrets to properly prepared soil for gardening!

Step 1: Become a Soil Detective! Test and Assess Your Ground

Okay, adventurers, our first mission is to investigate! Before you can make your soil amazing, you need to know what you’re starting with. It’s like being a detective for dirt! The best way to do this is with a soil test. This special test is like a science experiment that tells you super important secrets about your soil (source, source).

What secrets does a soil test unlock?

  • pH Level: This sounds tricky, but it just tells you if your soil is more acidic (like lemon juice) or alkaline (like soap). Most vegetables, those yummy things we love to grow, are happiest when the soil pH is just right – somewhere between 6.0 and 7.2 (source). A soil test will tell you your exact number, so you know if you need to adjust it slightly.
  • Nutrient Levels: Plants need food, just like us! A soil test reveals which important plant foods (like nitrogen, phosphorus, and potassium) are already in your soil and if you need to add more. It’s like checking the pantry before you go grocery shopping!
  • Organic Matter Content: This is the secret ingredient! Organic matter is stuff like old leaves and decomposed plants that makes soil rich and healthy. A soil test tells you how much of this good stuff you have.

You also need to figure out your basic soil type. Get your hands dirty and feel it! Is it:

  • Sandy Soil? Feels gritty, like beach sand. Water runs through it super fast, and it doesn’t hold onto food (nutrients) very well.
  • Silty Soil? Feels smooth and slippery when wet, almost like flour. It holds water better than sand but can get packed down.
  • Clay Soil? Feels sticky and heavy when wet, like modeling clay. It holds lots of water and nutrients but can become hard like a brick when dry, making it tough for roots and water to get through.
  • Loamy Soil? This is the jackpot! Loam is a fantastic mix of sand, silt, and clay. It feels crumbly, holds water just right (not too much, not too little), has plenty of space for air, and is packed with yummy organic matter (source). This is the dream soil everyone wants!

Knowing your soil’s secrets (pH, nutrients, type) is the first thrilling step towards creating the perfect home for your plants! Don’t skip this detective work!

Looking to get started on the right path? Check out our handy guides: Gardening Basics: Composting Guide and Organic Fertilizer Guide.

Step 2: Clear the Decks! Prepare Your Garden Stage

Alright, soil detectives, now that you know your soil’s secrets, it’s time to prepare the stage for your garden stars! Before you can start making your soil amazing, you need a clean slate. This means getting rid of anything that doesn’t belong, like pesky weeds or patches of grass (source).

  • Weed Warriors: Pull out all the weeds, making sure you get their roots too! If you leave roots behind, those sneaky weeds might just pop back up.
  • Grass Be Gone: If your garden spot is currently lawn, you’ll need to remove the sod. You can dig it out or use methods like sheet mulching (covering it with cardboard and compost) to smother it over time.
  • Rock Removal: Clear away any large rocks or debris that could get in the way of plant roots or your digging tools.

Think of this step as tidying up your plant’s future bedroom. A clean, clear space means less competition for water and food, giving your chosen plants the best chance to shine!

Supercharge your garden’s success further by learning How to Start a Raised Garden Bed.

Step 3: The Magic Ingredient! Boost Your Soil with Organic Matter

Here comes the real magic! Adding **organic matter** is almost always the answer to improving any soil type. It’s the ultimate soil conditioner.

Think of organic matter as the superfood smoothie for your garden soil! It makes everything better.

What awesome stuff counts as organic matter?

  • Compost: This is decomposed kitchen scraps and yard waste – pure gold for your garden!
  • Aged Manure: Poop from animals like cows, horses, or chickens (make sure it’s well-rotted, not fresh!).
  • Shredded Leaves: Fallen leaves break down beautifully.
Continue Reading

published

in

Harnessing Renewable Energy for a Sustainable Future: Powering Tomorrow’s World Today

Estimated Reading Time: 18 minutes

Key Takeaways

  • Renewable Dominance: Renewable energy (solar, wind, geothermal) is crucial for sustainability, combating climate change, and replacing finite fossil fuels.
  • Tech Advancements: Costs for solar and wind are rapidly decreasing, while efficiency improves. Energy storage is key to overcoming intermittency. Emerging tech like green hydrogen and advanced geothermal expands possibilities.
  • Economic & Environmental Wins: Renewables create jobs, enhance energy security, save water, improve air quality, and offer significant long-term economic benefits over fossil fuels.
  • Global & Local Action: International agreements (Paris Agreement), corporate commitments (RE100), and individual/community actions (rooftop solar, advocacy) are all driving the transition.
  • Overcoming Barriers: Challenges like grid upgrades, permitting, and initial costs remain, but collaborative solutions and smart policies are paving the way forward.

1. Introduction: Understanding Renewable Energy and Sustainability

Let’s talk about renewable energy. This is energy that comes from sources that nature keeps refilling, like sunshine, wind, and heat from inside the Earth. These sources won’t run out, unlike coal or oil.

Using renewable energy is key to building a better, lasting future – what we call sustainable development. It helps us live well today without harming the planet for people tomorrow. You can discover more about sustainable tech innovations for a greener future to see how these technologies are shaping our world.

Why is this so important right now?

  • Our planet is getting warmer because of climate change, causing big problems like stronger storms and rising seas.
  • The fuels we use most, like oil and gas (fossil fuels), are running low and their prices can jump up and down.
  • Countries around the world have promised to work together, like in the Paris Agreement, to cut down on pollution and protect the Earth.

“Thinking about sustainability means ensuring the needs of the present are met without compromising the ability of future generations to meet their own needs. Renewable energy is central to this vision.”

In this post, we’ll explore the main types of clean power:

  • Solar power (from the sun)
  • Wind energy (from the wind)
  • Geothermal energy (from Earth’s heat)
  • Energy storage solutions (ways to save energy for later)

We will see how these amazing technologies work together to create a path towards sustainability and a healthier planet for everyone. Making the switch to clean, renewable energy is essential for our future.

2. The Current State of Renewable Energy Sources

More and more people and countries are using renewable energy. Clean energy is growing fast all over the world!

  • Growth: In recent years, the amount of electricity generated from renewable energy sources like solar and wind has shot up. Many countries are setting records for how much clean energy they use.
  • Milestones: Sometimes, whole countries have run completely on renewable energy for hours, days, or even weeks! This shows it’s possible to power our lives without fossil fuels.
  • Falling Costs: Getting power from renewable energy used to be expensive. But now, technologies like solar panels and wind turbines are much cheaper. Often, they cost the same or even less than power from coal or gas. This makes clean energy a smart choice for everyone.
  • Pandemic Impact: The COVID-19 pandemic caused some delays, but overall, it made people realize how important reliable and clean energy is. Investment in renewable energy sources actually grew stronger during this time.

“The economic case for renewables is now as strong, if not stronger, than the environmental one. Cost parity or even superiority over fossil fuels is accelerating the transition globally.”

The world is clearly moving towards renewable energy. It’s becoming the main way we will power our homes, schools, and businesses in the future.

3. Solar Power: Harnessing the Sun’s Renewable Energy Potential for Sustainability

Solar power uses the sun’s light to make electricity. The main way we do this is with photovoltaic (PV) technology. Think of PV panels as special materials that turn sunlight straight into electrical power.

How Solar Cells Work:
Inside a solar panel are many solar cells. These cells are made of materials like silicon. When sunlight hits the silicon, it excites tiny particles called electrons. These excited electrons start to move, creating an electrical current – just like electricity flowing through a wire. It’s like the sun is knocking electrons loose to make power!

Types of Solar Power Systems:
Solar energy is very flexible. We can use it in lots of ways:

  • Residential Rooftop Systems: Many homeowners put solar panels on their roofs to make their own electricity and save money on bills.
  • Commercial Applications: Businesses put larger solar systems on their roofs or land to power their buildings and operations.
  • Utility-Scale Solar Farms: These are huge fields covered in solar panels, generating large amounts of electricity for the power grid, supplying towns and cities.
  • Building-Integrated Photovoltaics (BIPV): This means solar cells are built right into building materials, like roof tiles or windows that generate power.

Costs are Dropping:
One of the best things about solar power is that it’s getting much cheaper. Over the last ten years, the cost of solar panels has fallen by about 85%! This makes solar power affordable for more people and businesses.

Better Technology:
Scientists are always finding ways to make solar panels work better.

  • Efficiency: New types of cells, like multi-junction cells (which have multiple layers to catch different light) and perovskites (a new, promising material), can turn more sunlight into electricity. To understand the difference in panel types, see this comparison of monocrystalline vs polycrystalline solar panels.
  • Accessibility: Because costs are down and technology is better, solar power is now easier to get. Homeowners, small businesses, big companies, and whole towns can all use the sun’s energy. This helps achieve sustainability goals. For information on making solar power more affordable through government incentives, explore this guide to solar energy tax credits.

Solar energy can be used almost anywhere the sun shines, from small homes to giant power plants. Its ability to scale up or down makes it a vital part of our renewable energy future. It helps reduce our reliance on polluting fuels and contributes greatly to global sustainability.

“Imagine every rooftop, every suitable surface, generating clean power from the sun. That’s the adaptable potential solar energy brings to our sustainable future.”

4. Wind Energy: Power from the Air as a Key Renewable Energy Source

Wind energy captures the power of moving air – the wind – and turns it into electricity. This is done using large machines called wind turbines.

How Wind Turbines Work:
Wind turbines have long blades, like airplane wings. When the wind blows, it pushes the blades, making them spin. This spinning motion turns a generator inside the turbine, which produces electricity. It’s all about converting the wind’s movement energy (kinetic energy) into electrical energy.

Onshore vs. Offshore Wind:
We can build wind farms on land (onshore) or out in the sea (offshore).

  • Offshore:
    • Winds over the ocean are often stronger and steadier.
    • Offshore farms can be much bigger, generating more power.
    • They are far from homes, so noise or visual impact is less of a worry.
    • Building and maintaining turbines at sea is more expensive and difficult.
  • Onshore:
    • Building and connecting turbines on land is usually cheaper and easier.
    • Maintenance is simpler.
    • Finding suitable land away from homes can sometimes be challenging.

Reducing Carbon Footprints:
Wind energy is a clean renewable energy source. It doesn’t burn fuel or release harmful gases. It helps reduce the carbon footprint (the amount of pollution causing climate change) for:

  • Industries: Factories and large businesses can use wind power to run their machines cleanly.
  • Cities and Towns: Wind farms feed clean electricity into the power grid, reducing pollution for everyone.
  • Remote Areas: Wind turbines can provide reliable power to villages or communities far from the main grid.

Improving Wind Technology:
Wind turbines are getting better all the time:

  • Bigger Turbines: Newer turbines are massive, some taller than 200 meters (like a 60-story building!). Taller turbines reach stronger winds and capture more energy.
  • Smarter Blades: Blade designs are more aerodynamic, catching more wind with less noise.
  • AI Maintenance: Artificial intelligence helps predict when turbines might need repairs, preventing breakdowns.
  • Floating Platforms: For deep ocean waters where fixed towers aren’t possible, engineers are developing floating platforms for offshore turbines. To explore how wind energy can power your home, see this guide to home wind energy systems.

Wind Energy is a cost-effective way to generate clean electricity. As technology improves, the cost continues to drop, making it competitive with traditional power sources. It’s a vital part of the mix of renewable energy sources needed for a sustainable world.

5. Geothermal Energy: Using the Earth’s Internal Heat as a Renewable Energy Source

Geothermal energy means using the heat that comes from deep inside the Earth. Our planet’s core is incredibly hot (around 2,200°F or 1,200°C on average), and this heat naturally flows outwards. Geothermal systems tap into this constant heat.

Different Ways to Use Geothermal Heat:
We can use Earth’s heat in several ways:

  • Direct Use: Hot water from underground can be piped directly to heat buildings, greenhouses for growing food, fish farms, or relaxing hot springs and spas. Discover how geothermal energy offers a sustainable solution for home heating and cooling to learn more.
  • Geothermal Heat Pumps: These systems use the stable temperature just below the ground (which is warmer than the air in winter and cooler in summer) to help heat and cool buildings very efficiently.
  • Electricity Generation: In certain places, we can use underground steam or very hot water to spin turbines and generate electricity.

“Unlike the sun and wind, the Earth’s internal heat is always ‘on.’ This makes geothermal a uniquely reliable cornerstone for a renewable energy grid.”

How Geothermal Power Plants Work:
There are a few main types of geothermal power plants:

  • Dry Steam Plants: These use steam directly from underground reservoirs to turn turbines.
  • Flash Steam Plants: These pump very hot water from deep underground into a low-pressure tank, causing it to quickly turn (‘flash’) into steam, which then drives turbines.
  • Binary Cycle Plants: These use hot geothermal water (which might not be hot enough to flash into steam easily) to heat a separate liquid with a lower boiling point. This second liquid turns into vapour, which spins the turbines. This allows electricity generation from cooler geothermal resources.

A Reliable Power Source:
One huge advantage of geothermal energy is that it’s always available, 24 hours a day, 7 days a week. The Earth’s heat is constant, unlike sunshine (which disappears at night) or wind (which can stop blowing). This makes geothermal power a great “baseload” power source, providing steady electricity that the grid can rely on.

Where is Geothermal Potential Highest?
Geothermal resources are strongest in areas with volcanic activity or thin parts of the Earth’s crust. This includes:

  • The “Ring of Fire” around the Pacific Ocean.
  • Rift zones, where tectonic plates are pulling apart (like in East Africa or Iceland).
  • Geological “hot spots” (like Hawaii or Yellowstone).

Expanding Geothermal Power:
New technology called Enhanced Geothermal Systems (EGS) is helping us use geothermal energy in more places. EGS involves drilling deep and pumping water down to create underground reservoirs in hot rock, even where natural steam or hot water isn’t easily found. This could greatly expand where we can build geothermal power plants.

Geothermal energy is a reliable and clean renewable energy source. It provides consistent power day and night, making it a valuable part of our move away from fossil fuels.

6. Energy Storage Solutions: The Key to Unlocking Renewable Energy’s Full Potential

Solar and wind power are fantastic renewable energy sources, but they have a challenge: the sun doesn’t always shine, and the wind doesn’t always blow. This is called intermittency. Energy storage solutions are like giant batteries that save extra energy when it’s sunny or windy and release it when it’s needed later. For a detailed look at one key technology, see this complete guide to Tesla Powerwall and home battery solutions.

Why Storage is Crucial:
Energy storage is often called the “missing link” for making renewable energy truly widespread. It allows us to use clean energy whenever we need it, not just when it’s being generated. This makes the power grid more reliable and flexible.

How Storage Helps:
Storage tackles the intermittency problem by:

  • Saving excess solar power generated during the day to use at night.
  • Storing wind power generated during windy periods for use when the air is calm.
  • Ensuring a smooth and constant supply of electricity to homes and businesses.

“If renewables are the engine of the clean energy transition, energy storage is the fuel tank and transmission, allowing that engine to run smoothly anytime, anywhere.”

Types of Energy Storage:
There are many ways to store energy:

  • Lithium-ion Batteries: These are the most common type today, used in everything from phones and electric cars to large grid-scale storage systems. They are getting cheaper and better.
  • Flow Batteries: These use tanks of liquid electrolytes. They can store large amounts of energy for longer periods than lithium-ion batteries, making them good for grid support.
  • Pumped Hydro Storage: This is an older, large-scale method. Water is pumped uphill into a reservoir when there’s extra electricity. When power is needed, the water flows back downhill through turbines to generate electricity.
  • Compressed Air Energy Storage (CAES): Air is compressed and stored underground (like in caverns or tanks). When electricity is needed, the compressed air is released to spin turbines.
  • Gravity-Based Storage: These clever systems lift heavy weights (like concrete blocks or rail cars) when energy is plentiful and lower them to generate electricity when needed.
  • Thermal Storage: This involves storing energy as heat or cold (e.g., molten salts for storing solar heat, or ice for cooling).

Benefits for the Grid and Sustainability:
Energy storage solutions do more than just handle intermittency. They help make our power system work better and support sustainability:

  • Grid Stability: Storage helps keep the power grid stable by balancing supply and demand quickly.
  • Demand Response & Peak Shaving: It can release stored energy during times of high demand (like hot summer afternoons), reducing the need to fire up expensive and polluting “peaker” power plants that run on fossil fuels.
  • Reducing Waste: Storage prevents us from having to “curtail” or waste renewable energy when generation is high but demand is low.
  • Off-Grid Power: Batteries combined with solar panels can provide reliable electricity to remote areas without grid connections.

Innovations in energy storage solutions are making them more efficient, longer-lasting, and affordable. They are essential for integrating large amounts of renewable energy into our power systems and creating a truly sustainable energy future.

7. The Environmental Impact of Renewable Energy and Sustainability

Switching to renewable energy has huge benefits for our planet and our health. It’s a cornerstone of environmental sustainability.

Fighting Climate Change:
The biggest benefit is cutting down on greenhouse gases. Fossil fuels release carbon dioxide (CO2) and other gases when burned, trapping heat and causing global warming. Renewable energy sources like solar, wind, and geothermal generate electricity with little to no greenhouse gas emissions. Using more renewables means less pollution warming the planet.

Saving Water:
Traditional power plants (especially coal and nuclear) use massive amounts of water for cooling. Many renewable energy technologies, like solar PV and wind turbines, use very little or no water to operate. This is crucial in areas where water is scarce.

Cleaner Air:
Burning fossil fuels releases pollutants like sulfur dioxide, nitrogen oxides, and particulate matter into the air. These cause smog, acid rain, and serious health problems like asthma and heart disease. Renewable energy doesn’t produce these harmful air pollutants, leading to cleaner air and healthier communities.

“Choosing renewable energy isn’t just about distant climate goals; it’s about breathing cleaner air today and protecting vital water resources for tomorrow.”

Land Use Considerations:
Renewable energy projects do require land, but there are smart ways to manage this:

  • Agrivoltaics: This combines solar panels and farming on the same land. Panels can provide shade for crops or animals, and farming can continue underneath or between rows of panels.
  • Multiple-Use Wind Farms: Wind turbines often have a small footprint. The land between turbines can still be used for farming or grazing. Offshore wind farms can coexist with fishing or marine conservation areas.
  • Wildlife-Friendly Design: Developers are increasingly designing projects to minimize impacts on birds and other wildlife, such as using radar to pause turbines when flocks approach or choosing locations carefully.

Thinking About the Full Lifecycle:
It’s important to consider the environmental impact of making, using, and disposing of renewable technologies.

  • Manufacturing: Making solar panels and wind turbines requires energy and materials, some of which need careful sourcing.
  • Operation: Once running, most renewables have very low environmental impact.
  • Decommissioning: As technologies reach the end of their life, we need good systems for recycling materials like glass, metals, silicon from solar panels, and fiberglass from turbine blades. The industry is working hard on improving recycling processes.

Overall, the environmental benefits of renewable energy far outweigh the impacts. By replacing fossil fuels, renewables drastically cut greenhouse gases, save water, and improve air quality, making our world healthier and supporting long-term sustainability.

8. Economic Benefits: How Renewable Energy Sources Drive Sustainability and Growth

Switching to renewable energy sources isn’t just good for the planet; it’s also great for the economy and brings us closer to sustainability.

Creating Jobs:
The renewable energy sector creates lots of jobs. These jobs are in:

  • Manufacturing solar panels and wind turbines
  • Installing renewable energy systems
  • Maintaining and operating power plants
  • Research and development

Studies show that investing in renewable energy sources like solar and wind often creates more jobs per unit of energy (or per dollar invested) than investing in fossil fuels.

Energy Independence and Resilience:
Countries that rely heavily on imported fossil fuels can face unstable prices and supply disruptions. Developing local renewable energy sources like solar, wind, and geothermal means relying on resources available right at home. This increases energy security and makes the economy more resilient.

Saving Money in the Long Run:
While building renewable projects requires upfront investment, they save money over time:

  • No Fuel Costs: Sunshine and wind are free! Once built, renewable plants don’t need to constantly buy fuel like coal or gas plants do.
  • Lower Maintenance: Technologies like solar panels often have lower maintenance needs than complex fossil fuel plants.
  • Reduced Health and Environmental Costs: Cleaner air means lower healthcare costs from pollution-related illnesses. Avoiding climate change damage also saves massive amounts of money.

“Investing in renewables is investing in local jobs, stable energy prices, and a healthier population – an economic trifecta that fossil fuels simply cannot match.”

Opportunities for Developing Nations:
Countries that are still building their energy systems have a chance to “leapfrog” old, polluting fossil fuel infrastructure. They can build modern, clean energy systems based on renewable energy sources from the start, leading to faster, more sustainable development.

Promoting Economic Equity:
Renewable energy can also make energy systems fairer:

  • Distributed Ownership: Rooftop solar allows individuals and businesses to own their power generation.
  • Community Energy: Local groups can develop and own renewable projects (like community solar farms), keeping benefits and profits within the community.
  • Energy Access: Renewables, especially solar with battery storage, can bring reliable electricity to poor or remote communities that the traditional grid hasn’t reached, opening up economic opportunities.

Investing in renewable energy sources powers economic growth, creates jobs, enhances energy security, saves money, and builds a more equitable and sustainable future for everyone.

9. The Circular Economy of Renewable Energy Technologies for Sustainability

A circular economy means keeping resources in use for as long as possible, getting the most value from them, and then recovering and regenerating products and materials at the end of their life. Applying this idea to renewable energy makes it even better for sustainability.

What Circular Economy Means for Energy:
Instead of a “take-make-dispose” model, a circular approach for renewable energy focuses on:

  • Using fewer raw materials.
  • Designing products to last longer and be easily repaired.
  • Reusing components where possible.
  • Recycling materials effectively when products reach the end of their life.

Recycling Renewable Technologies:
Work is underway to create strong recycling pathways for key components:

  • Solar Panels: These contain valuable materials like glass, aluminum frames, silicon, silver, and copper. Specialized facilities are being developed to recover these materials efficiently so they can be used to make new panels or other products.
  • Wind Turbines: Turbine towers are mostly steel, which is easily recycled. Nacelles (the box at the top) contain metals and electronics. Blades, often made of fiberglass or carbon fiber composites, are more challenging, but new methods are being developed to reuse or recycle them (e.g., in cement production or other composite materials).
  • Batteries: Recycling batteries, especially lithium-ion batteries used for storage, is crucial to recover valuable materials like lithium, cobalt, nickel, and manganese, and to prevent waste. Pathways for collection and processing are improving rapidly.

“True sustainability requires thinking beyond just clean generation; it demands we manage the entire lifecycle of our energy technologies responsibly, from sourcing to recycling.”

Designing for Circularity:
Manufacturers are starting to design renewable energy technologies with the circular economy in mind:

  • Longer Lifespans: Making products more durable so they last longer reduces waste and the need for replacements.
  • Easy Disassembly: Designing products so they can be easily taken apart makes repair and recycling simpler.
  • Material Recovery: Choosing materials that are easier to recover and recycle, and avoiding hazardous substances.

Industry and Policy Action:
Companies and governments are pushing for circularity in the renewable energy sector through:

  • Industry partnerships to develop recycling standards and infrastructure.
  • Regulations that require manufacturers to take responsibility for end-of-life products (Extended Producer Responsibility).
  • Research into new recycling technologies and circular business models.

Building a circular economy for renewable energy technologies minimizes waste, conserves valuable resources, and reduces the environmental footprint of clean energy even further, enhancing its contribution to long-term sustainability.

10. Emerging Technologies and Innovations in Renewable Energy Sources and Storage

The world of renewable energy sources is constantly evolving, with exciting new technologies and improvements making clean energy even more powerful and accessible. Energy storage solutions are also advancing rapidly.

Cutting-Edge Renewable Developments:

  • Floating Solar Farms: Installing solar panels on reservoirs, lakes, or even coastal waters saves land space and can improve panel efficiency due to water’s cooling effect.
  • Next-Generation Geothermal: Advanced drilling techniques and Enhanced Geothermal Systems (EGS) aim to unlock vast geothermal resources deep beneath the Earth’s surface, potentially making geothermal power available almost anywhere.
  • Green Hydrogen: Using renewable electricity (from solar or wind) to split water into hydrogen and oxygen (electrolysis) produces “green hydrogen.” This clean fuel can be used for transport, industry, or energy storage.
  • Building-Integrated Renewables: Beyond solar roof tiles, researchers are developing transparent solar windows that generate electricity, solar roads, and building facades that incorporate wind or solar technology seamlessly.
  • Transparent Solar & Solar Roads: Imagine windows that generate power or roads that harvest solar energy! These futuristic ideas are under development.

“Innovation never stops. The next wave of renewable and storage tech promises even greater efficiency, broader application, and deeper integration into our lives.”

Smart Tech Integration:

  • Artificial Intelligence (AI): AI helps optimize energy production by predicting weather patterns for solar and wind farms, forecasting energy demand, and managing grid operations more efficiently. It also helps with predictive maintenance for turbines and panels.
  • Internet of Things (IoT): Connected sensors and devices allow for real-time monitoring and control of distributed energy resources (like rooftop solar and batteries), creating smarter and more responsive energy systems.

New Frontiers in Energy Storage:
Beyond lithium-ion, researchers are exploring better energy storage solutions:

  • Solid-State Batteries: These promise higher energy density (more storage in less space), faster charging, and improved safety compared to current lithium-ion batteries.
  • Metal-Air Batteries: These potentially offer very high energy density at lower costs, although technical challenges remain.
  • Continued improvements in flow batteries, thermal storage, and other technologies are focused on longer duration storage (days or weeks) needed for a fully renewable grid.

These innovations promise to make renewable energy sources more efficient, versatile, and cost-effective. Combined with advances in energy storage solutions, they are paving the way for a future powered entirely by clean, sustainable energy.

The shift towards renewable energy is happening worldwide, driven by international agreements, national policies, business commitments, and community action seeking sustainability.

International Commitments:

  • Paris Agreement: This global pact aims to limit global warming, pushing countries to set targets for reducing greenhouse gas emissions, largely through adopting renewable energy.
  • National Net-Zero Pledges: Many countries have set goals to reach “net-zero” emissions (balancing emissions produced with emissions removed) by mid-century, requiring massive growth in clean energy.
  • Renewable Portfolio Standards (RPS): Many states and countries require utilities to source a certain percentage of their electricity from renewable sources by a specific date.

Corporate Sustainability Movements:
Businesses are playing a huge role in driving demand for renewable energy:

  • RE100 Initiative: Hundreds of major global companies have committed to sourcing 100% of their electricity from renewables.
  • ESG Investing: Investors increasingly consider Environmental, Social, and Governance (ESG) factors, pushing companies towards sustainability and clean energy investments.
  • Corporate Power Purchase Agreements (PPAs): Companies sign long-term contracts directly with renewable energy developers to buy clean power, guaranteeing demand and helping new projects get built.

“From global agreements to boardroom decisions, the message is clear: the future of energy is renewable, and the momentum for sustainability is building across all sectors.”

Community and Local Action:
The transition is also happening from the ground up:

  • Energy Cooperatives: Local citizens pool resources to develop and own renewable energy projects, like community solar farms or wind turbines.
  • Municipal Renewable Projects: Cities and towns are setting their own ambitious renewable energy goals and investing in local clean power generation.
  • Indigenous-Led Renewables: Indigenous communities worldwide are developing renewable energy projects on their lands, creating energy sovereignty and economic benefits.

Future Projections:
Organizations like the International Renewable Energy Agency (IRENA) provide roadmaps showing how the world can transition to a renewable energy-based system. Their analyses suggest that renewables could dominate global electricity grids by 2050, demonstrating the technical and economic feasibility of achieving ambitious sustainability goals through clean energy.

These global trends and policies create a powerful momentum, accelerating investment, innovation, and deployment of renewable energy technologies worldwide, pushing us closer to a sustainable future.

12. Overcoming Barriers to Widespread Adoption of Renewable Energy Sources for Sustainability

While the future of renewable energy sources is bright, there are still challenges to overcome to achieve truly widespread adoption and meet sustainability goals quickly.

Remaining Hurdles:

  • Initial Capital Costs: Although the lifetime cost of renewables is often lower, the upfront cost of building solar farms, wind projects, or grid upgrades can still be high compared to existing fossil fuel plants.
  • Grid Infrastructure: Our current electricity grids were mostly built for large, central power plants. Integrating large amounts of variable renewables (solar, wind) requires significant upgrades, including new transmission lines and smarter grid management systems.
  • Permitting and Regulations: In some places, getting permits to build renewable energy projects can be slow and complex, delaying deployment. Regulations may also need updating to support new technologies and business models.
  • Community Acceptance: Sometimes, local communities resist new projects due to concerns about visual impact, noise (for wind turbines), or land use (“Not In My Backyard” or NIMBYism). Early engagement and benefit-sharing are key.
  • Technical Challenges: Integrating very high percentages of renewables while ensuring grid reliability requires ongoing technical innovation, particularly in energy storage and grid control.

“The path to 100% renewables isn’t without obstacles. Addressing infrastructure, policy, and community concerns proactively is vital for accelerating the transition.”

Collaborative Solutions:
We can overcome these barriers by working together:

  • Public-Private Partnerships: Governments and private companies can collaborate to finance and build necessary infrastructure like transmission lines or large storage projects.
  • Innovative Financing: Tools like green bonds (loans specifically for environmental projects), tax incentives, and Energy Service Companies (ESCOs) can help lower upfront costs and attract investment.
  • Technology Transfer: Sharing best practices and technologies between countries helps accelerate adoption, especially in developing nations.
  • Smart Policy Design: Governments can create stable, forward-looking policies that provide long-term certainty for investors, streamline permitting, and incentivize renewable energy sources. Carbon pricing can also level the playing field with fossil fuels.
  • Education and Workforce Training: Building public awareness and training skilled workers (installers, technicians, engineers) is essential for the growing renewable sector.

Addressing these challenges requires effort from governments, industry, communities, and individuals. By tackling these barriers proactively, we can speed up the transition to a clean energy system based on abundant renewable energy sources, ensuring a sustainable future for all.

13. Individual and Community Action: Driving Renewable Energy and Sustainability Locally

The transition to renewable energy isn’t just for big companies or governments. Individuals and communities play a vital role in driving change and advancing sustainability.

Actionable Steps for Individuals:

  • Home Renewable Options:
    • Rooftop Solar: If you own your home, installing solar panels can reduce your electricity bills and carbon footprint significantly. Look into local incentives and financing options.
    • Geothermal Heat Pumps: Consider these highly efficient systems for heating and cooling your home using the Earth’s stable temperature.
  • Community Solar: If you can’t install solar on your own roof (e.g., if you rent or your roof isn’t suitable), you may be able to subscribe to a local community solar project and receive credits on your electricity bill.
  • Green Power Purchasing: Many utility companies offer options to buy electricity generated from renewable energy sources. Check your provider’s offerings for “green power” or “renewable energy choice” programs.
  • Energy Efficiency: Using less energy is the cleanest energy! Improve your home’s insulation, use energy-efficient appliances (like LED lighting), and be mindful of your energy consumption. For tips on making your home more efficient, consider performing a DIY home energy audit. Efficiency complements renewable energy perfectly, and smart thermostats can be a great tool in boosting your home energy efficiency.

“Don’t underestimate the power of individual and local action. Every solar panel installed, every efficiency upgrade made, every voice raised for clean energy policy makes a difference.”

Evaluating Your Options:
When considering renewable energy options, research:

  • Your local climate and resources (sunshine hours, wind potential).
  • Available government incentives, tax credits, or rebates.
  • Reputable local installers and companies.
  • Different financing options (purchase, lease, PPA).

Advocacy and Support:
Your voice matters!

  • Local Level: Encourage your town or city council to set renewable energy goals, streamline permits for solar, or support community energy projects.
  • Regional/National Level: Contact your elected officials to support policies that promote renewable energy, carbon pricing, and investments in clean energy infrastructure.
  • Spread the Word: Talk to friends, family, and neighbors about the benefits of renewable energy and share positive stories.

Success Stories:
Countless individuals have lowered their bills and environmental impact with rooftop solar. Communities have banded together to build their own wind or solar farms, keeping jobs and profits local. Citizen advocacy has led to stronger clean energy policies in many regions. Every action contributes to the larger goal of sustainability.

By taking action at home and in our communities, we can all help accelerate the shift to a future powered by clean, reliable renewable energy.

14. Conclusion: The Renewable-Powered Future and Our Path to Sustainability

We’ve explored the incredible potential of renewable energy. From the sun’s power captured by solar panels, to the wind harnessed by turbines, and the Earth’s internal heat tapped by geothermal systems, clean energy sources are transforming how we power our world. Crucially, energy storage solutions are making these sources reliable day and night.

Adopting renewable energy is essential for tackling our biggest challenges: climate change and building a sustainable future. It dramatically cuts the pollution warming our planet, cleans our air and water, conserves precious resources, and drives economic growth by creating jobs and fostering energy independence. Embrace sustainable tech innovations for a greener future to be part of this transformative change.

“The question is no longer if we will transition to renewable energy, but how quickly and effectively we can make it happen for the benefit of all.”

The vision of a future powered mainly by renewable energy is no longer a distant dream. Costs are falling, technology is improving rapidly, and global commitment is growing. The transition away from polluting fossil fuels towards clean, renewable energy is not just necessary for sustainability, it is happening now and becoming unstoppable.

This shift requires effort from everyone – governments setting bold policies, industries innovating and investing, communities developing local projects, and individuals making conscious choices about their energy use. Together, we can accelerate this transition and build a brighter, cleaner, more prosperous, and truly sustainable world powered by renewable energy.

Call-to-Action

Ready to be part of the clean energy future? Here’s how you can contribute:

  • Investigate: Explore renewable energy options for your home or business. Could solar panels work for you? Is community solar available? Can you switch to a green power plan?
  • Support: Advocate for policies at the local, state, and national levels that encourage renewable energy adoption, grid modernization, and carbon reduction. Let your elected officials know you support clean energy.
  • Share: Talk about the benefits of renewable energy with your friends, family, and colleagues. Share articles like this one and help spread awareness.

To learn more about specific technologies, incentives in your area, or ways to get involved, check resources from your local government, utility provider, or reputable environmental organizations. Let’s work together to harness the power of renewable energy for a better tomorrow.

FAQ

Q: What is the most significant benefit of switching to renewable energy?
A: The most significant benefit is drastically reducing greenhouse gas emissions that cause climate change. Renewables provide power with little to no emissions, unlike fossil fuels. Additional major benefits include cleaner air, water conservation, energy independence, and job creation.


Q: Are renewable energy sources reliable enough to power the entire grid?
A: Individually, solar and wind are variable (intermittent). However, when combined with geographically diverse deployment, complementary sources like geothermal and hydropower, and crucially, energy storage solutions (like batteries), a reliable grid powered predominantly by renewables is achievable and increasingly becoming a reality.


Q: Is renewable energy more expensive than fossil fuels?
A: While some renewable projects require significant upfront investment, the costs of solar and wind power have fallen dramatically. In many places, building new solar or wind is now cheaper than building new fossil fuel plants. Furthermore, renewables have zero fuel costs, making their long-term operational costs lower and more predictable.


Q: What can I do personally to support renewable energy if I can’t install solar panels?
A: You can support renewables by: opting into a green power program through your utility, subscribing to community solar if available, improving your home’s energy efficiency (which reduces overall demand), and advocating for pro-renewable policies by contacting your elected officials.


Q: What happens to solar panels and wind turbines at the end of their lifespan?
A: The industry is actively developing and improving recycling processes. Solar panels contain valuable materials like glass, aluminum, and silicon that can be recovered. Wind turbine blades are more challenging, but methods for recycling or repurposing the materials (like fiberglass) are advancing. Promoting a circular economy for these technologies is a key focus for sustainability.

Continue Reading

Trending